Category Archives: Garden Advice

10 Easy Flowers to Grow From Seed

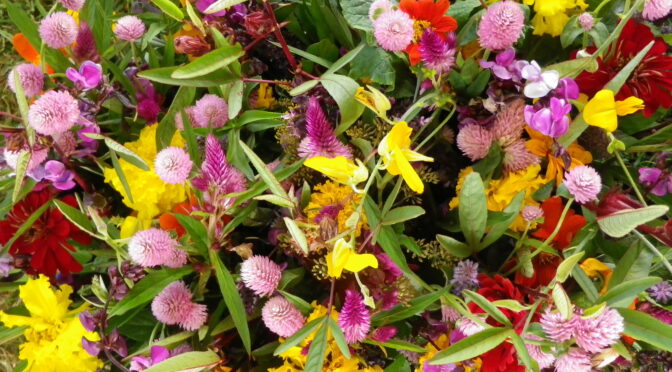
While some folks are glad for some time off, November can be a sad time of year for many gardeners. In much of the US, all but the most cold-hardy plants have been hit by frost. Even in warmer areas, gardeners are now dealing with dwindling daylight. Thankfully the 2023 catalogs will be shipping out soon, and we can all start dreaming and planning for spring! Flowers seeds are one of my favorite things to peruse in winter and are the most affordable way to create a large flower garden come spring. Here are some of the easiest flowers to grow from seed, even for beginner gardeners.

Bachelor’s Buttons

  • Annual
  • Full Sun
  • 65 Days to Bloom
  • Blooms Mid-Summer – Fall
Polka Dot Bachelor's Buttons (flowers from seed)
Polka Dot Bachelor’s Buttons

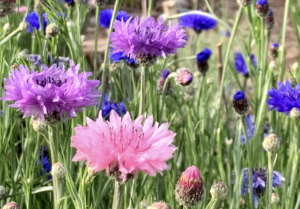
A favorite for cut flowers and dried arrangements, bachelor’s button varieties may have blue, red, rose, lavender, or maroon-black blooms. They’re great for attracting butterflies. It’s believed that they may have earned their name during the Victorian era when it was common to place flowers through the buttonholes of men’s suit coats. 

Bachelor’s buttons can be direct sown in mid-spring when the soil temperatures reach about 60°F. Alternatively, they can be sown indoors about 6 to 8 weeks before your last frost and transplanted out. 

Calendula

  • Annual
  • Full Sun
  • 85 Days to Bloom
  • Blooms Mid-Summer
Calendula Resina (flowers from seed)
Resina Calendula 

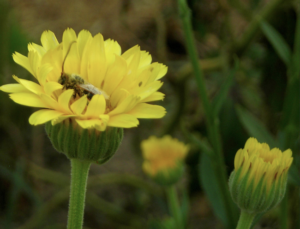
Beautiful and medicinal, you can use calendula flowers in bouquets, for food coloring, cake decorations, natural dye, saffron substitute, or salves and balms to calm mild skin irritations. Herbalists prize the strain Resina Calendula for its high resin content. 

Direct sow calendula or start it indoors 6 to 8 weeks before your last frost. Seeds need darkness and germinate best around 55-65°F. Calendula often fades in the late summer heat but can be succession planted for fall harvests. 

Cosmos

  • Annual
  • Full Sun – Partial Shade
  • 45-68 Days to Bloom
  • Blooms All Summer
Sensation Mix Cosmos (flowers from seed)
Sensation Mix Cosmos

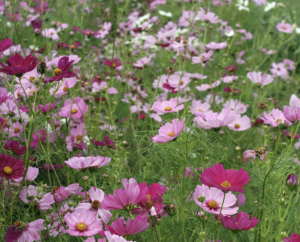
Cosmos will bloom all summer long, especially if you keep up with deadheading. You can find cosmos in various colors, including shades of orange, yellow, pink, purple, red, and white. They’re excellent for bouquets, and the seed heads attract birds. They self-seed readily. 

Cosmos prefer full sun but tolerate partial shade, poor soils, and drought once established. Cosmos may be direct sown after all danger of frost has passed and the soil has reached 70°F. For extra early blooms, they can also be started indoors about 4 to 6 weeks before your last frost. 

Four O’Clocks

  • Annual
  • Full Sun
  • Blooms June to Fall
Don Pedros Mixed Colors Four O'Clocks (flowers from seed)
Don Pedros Mixed Colors Four O’Clocks

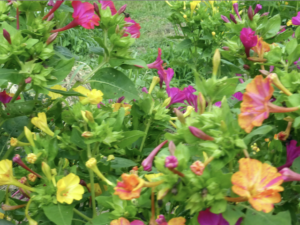
These neat flowers open around four in the afternoon and are pollinated by sphinx and hawk moths! They can be grown in the garden or pots. Marvel of Peru Four O’Clocks make excellent cut flowers and Don Pedros Mixed Four O’Clocks offer beautifully variegated flowers, primarily in shades of magenta or yellow.

Four O’Clocks do best when direct sown in late spring after the danger of frost has passed and soil temperatures are about 70°F. They do well in average, well-draining, moist soil, and full sun. They may self-seed.

Marigolds

  • Annual
  • Full Sun – Partial Shade
  • 55-93 Days to Bloom
  • Blooms All Summer
Crackerjack Mix African Marigold (flowers from seed)
Crackerjack Mix African Marigold

The name “marigold” is said to have been derived from “Mary’s gold” in reference to the golden color of many of these blooms and the Virgin Mary. Today, we often appreciate marigolds both for their beauty and their usefulness. Marigolds make excellent companion plants helping to deter nematodes and to attract beneficial insects such as lacewings, parasitic wasps, and ladybugs.

Marigolds prefer full sun but may tolerate some afternoon shade, especially in the hottest parts of the country. Marigolds may be direct sown after all danger of frost has passed and the soil has reached 70°F. Start them indoors 6 to 8 weeks before your last frost for extra early blooms.

Morning Glories

  • Annual
  • Full Sun
  • 65 Days to Bloom
  • Blooms from Early Summer to Fall
Grandpa Ott's Morning Glory (flowers from seed)
Grandpa Ott’s Morning Glory

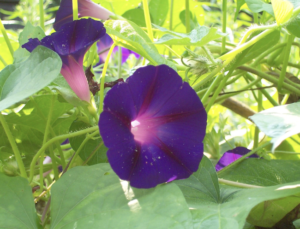
Did you know that the humble morning glory helped inspire Seed Savers Exchange and the whole heirloom movement? Grandpa Ott’s Morning Glory, a family heirloom from Diane Ott Whealy, was one of the first varieties to become part of SSE. These easy-to-grow vining flowers add beauty to the garden on trellises or can be grown in containers to spruce up porches. 

Morning glories thrive in full sun. They self-seed readily. Before planting, soak seeds for two days, changing the water every 12 hours. Then, direct sow after all danger of frost has passed, and the soil has reached 70°F or sow indoors about six weeks before your last frost date.

Old Fashion Vining Petunias

  • Annual
  • Full Sun
  • Blooms Early Summer to Fall
Old Fashioned Vining Petunia (flowers from seed)
Old Fashioned Vining Petunia

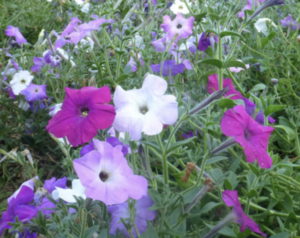
Sweet fragrance, soft colors, and a self-sowing nature gives Old Fashioned Vining Petunia a sure spot on this list. Our first regular staff member, Grandma Jean, recalls this heirloom petunia from her grandmother’s garden. Old Fashioned Vining dates back to the early 1900s, well before Grandma Jean was born.

Sow in flats or pots indoors in March or April and transplant out after the last frost. Ever-blooming and much hardier than modern varieties, this old favorite blooms into the fall when other annuals have faded and gone. 

Poppies

  • Annual
  • Full Sun
  • 55-65 Days to Bloom
Hungarian Blue Breadseed Poppy (flowers from seed)
Hungarian Blue Breadseed Poppy

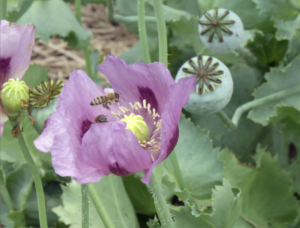
The stunning, easily recognizable, papery blooms are an excellent addition to any garden and can be found in various colors. Some varieties also produce delicious seeds for baking and seed pods that look stunning in dried arrangements. 

Direct seed poppies in the fall or as soon as the soil can be worked in the spring. Sow approximately 1/4” deep; the seeds require darkness to germinate. Thin plants when the first true leaves appear.

Sunflowers

  • Annual
  • Full Sun 
  • 53-71 Days to Bloom
  • Blooms July-August
Mammoth Sunflower (flowers from seed)
Mammoth Sunflower

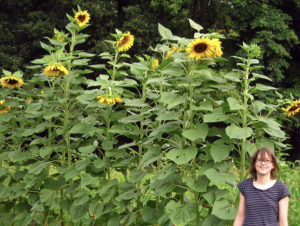
Giant, cheerful blooms are great for wildlife and fun for kids and adults alike. Some varieties offer excellent seed production, while others, like Velvet Queen, are well-suited for cut flower arrangements. Some archaeologists believe Native Americans may have cultivated sunflowers as early as 3000 BC.

Direct sow seeds after the danger of frost has passed. Taller varieties may require staking. Ideally, it would help if you planted them in a spot protected from heavy winds. 

Zinnias

  • Annual
  • Full Sun
  • 60-70 Days to Bloom
  • Blooms All Summer
Red Beauty Zinnias
Red Beauty Zinnias

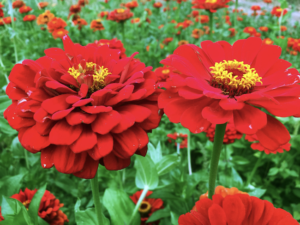
Excellent for cut flowers or just adding tons of long-lasting color to your flower beds, zinnias are one of the easiest flowers to grow from seed. Zinnias also offer a surprising variety with spiky petals like Cactus-Flowered or the double flowers of Red Beauty and a wide range of colors.

Direct sow after all danger of frost has passed and the soil has reached 70°F, or sow indoors 3 to 4 weeks before your last frost for extra early blooms. Sow several successions for a steady supply of cut flowers and keep up with deadheading. 

Starting flowers from seed is the most affordable way to add color and beauty to your garden. These ten flowers are easy for beginner gardeners to start from seed and maintain. Add a few of these to your 2023 list for stunning beds, borders, and bouquets!

Herbal Tinctures: The Folk Method

One easy way to start working with medicinal herbs is to create tinctures. A tincture is simply a liquid extract of a medicinal plant. They’re a great way to preserve herbal medicine in season. They also help concentrate the active ingredients in a plant, allowing you to use an herbal remedy conveniently. You can take a drop of tincture rather than a cup of tea, or for those who struggle with it, having to swallow capsules. Today, we’ll cover how to create your own tinctures using the folk method.

***None of the information in this post is intended to diagnose or treat any condition. Consult your physician for medical advice.***

***When using wild plants, always be 100% sure of their identification before employing it in any herbal or edible preparation.***

History of Tinctures

There is an incredibly long history of tinctures in medicine. The Al-Qanoon fi al Tibb (The Canon of Medicine), an encyclopedia of medicine in five books compiled by Persian physician-philosopher Avicenna and finished in 1025, includes instructions for making tinctures!

It’s likely that the use of tinctures dates back much further and probably started shortly after the invention of distillation. What’s now China, Egypt, Turkey, and Israel may have been distilling alcohol and creating tinctures as far back as 2000 BC. 

Early distillation looked far different from what we know today. Writings from 4th century Greece credit the first modern distillation with an alembic to the western alchemist Maria the Jewess between AD 200 – 300.

Alcohol distillation didn’t occur in Europe until the 12th century, with alchemists primarily interested in creating elixirs. Slowly, the process became more widely used, as did tinctures and recreational alcohol. By the 1800s, tinctures were common in European medicine. 

Lemon Balm Leaves, Mason Jar, and Knife
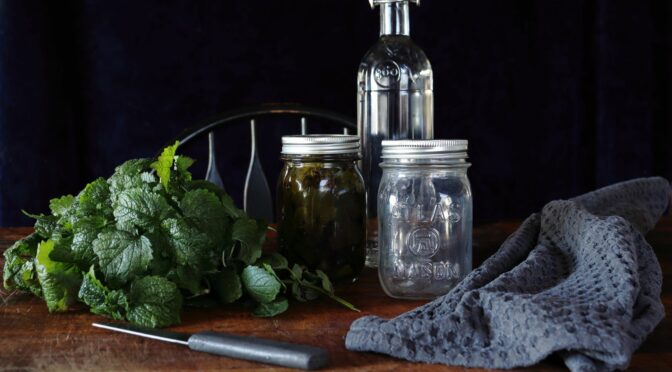
What’s the folk method?

The folk method is likely how the first tinctures were made and is still in use today. It’s an easy and effective way to create tinctures without a scale or measuring cup. To use the folk method, pack herbs into a glass jar or container and cover them with alcohol. It’s as simple as that!

Alternatively, as you become a more experienced herbalist, you may want to learn to create weight-to-volume tinctures. These types of tinctures combine macerated herbs by weight to alcohol by volume. Often, fresh herbs are tinctured at a ratio of 1:2 with alcohol, and dry herbs are tinctured at a ratio of 1:5. The ratio may also vary with the type of herb.

We’ll stick with the folk method for this blog, but The Herbal Academy has an excellent weight-to-volume tincture guide you can read here.

What do I need to make a folk tincture?

You can make a tincture from nearly any herb you have on hand. You can use fresh herbs you’ve grown or gathered or dried herbs from a trustworthy source like local farms or Mountain Rose Herbs. In the past, we’ve featured posts on holy basil and goldenrod tinctures.

You may also want to create a tinctures and select herbs with a specific goals in mind. Below are a few herbs that herbalists will commonly tincture:

  • Echinacea
  • Coltsfoot
  • Holy Basil
  • Valerian 
  • Feverfew 
  • Chicory Root
  • Chamomile
  • Raspberry Leaves
  • Lemon Balm
  • Goldenrod
  • Mint
  • Skullcap
  • Lovage

***Always thoroughly research an herb before using it and consult your physician. Some herbs are known to cause adverse reactions when combined with prescription medications. Herbs may also cause allergic reactions or other illnesses when used in inappropriate concentrations.***

Alcohol

You’ll also need 80-proof alcohol. Many people choose to use vodka as it doesn’t impart much flavor, but you can choose to use others like brandy or gin. Byron Ballard, Appalachian urban farmer, witch, and author of Roots, Branches, & Spirits: The Folkways and Witchery of Appalachia, says she prefers rum as it adds a bit of nicer flavor. 

Other Supplies

Depending on the herb you’re working with, you may need a clean knife, scissors, or grater to prepare your herb. You also need a clean jar with a lid that seals well. An ill-fitting lid may let the alcohol slowly evaporate. 

Later, you’ll need a strainer or cloth to filter your aged tincture. You also need a clean container to store the filtered tincture in. Depending on the container you choose, a funnel may also be helpful.

Strainer, tincture in mason jar, mason jar with herbs, lemon balm leavesMaking a Tincture with the Folk Method

  • Prepare your herbs. Roots should be scrubbed and chopped or grated, and it’s best to remove large stems from herbs. You may also want to chop up leaves and flowers to help speed up the process.
  • Place the herbs into a container. You may want to pack light, fluffy herbs down gently.
  • Cover your herbs with alcohol. Press the herbs down a bit so that the alcohol covers them completely.
  • Place a tight lid on the container and store it somewhere dark for a minimum of two to six weeks. 
  • Check on and shake your container every few days, especially in the beginning. Press the herbs down or add alcohol as needed to keep them covered.
  • Strain the plant material out of your finished tincture. A wire strainer may do for larger pieces, but you may need a finer filter, like a clean bandana, for fine herbs.

Can I make a tinctures without alcohol?

While a tincture is technically defined as an ingredient dissolved in alcohol, other ways exist. Increasingly, herbalists are using the word tincture to refer to herbs in vinegar or glycerin for those who need or want an alcohol-free option. Learn how to make herbal glycerites from The Herbal Academy.

Storing Tinctures

After you strain your tincture, you want to store it somewhere cool and dark. If available, brown glass bottles are ideal for tinctures as they block some of the light. Small bottles with droppers can be handy, especially if you want to take your tincture regularly.

Generally, I use and then replace tinctures within two years. However, tinctures may keep for up to 3 to 5 years.

Using Your Tincture

How you use your tincture largely depends on what it is. Herbalists generally may make recommendations by the drop or dropper full, referring to those small bottles with droppers. 

Tincture recommendations vary widely by herb and purpose, from taking a dropper full when you’re feeling anxious to taking 30 drops up to three times a day when you’re experiencing cold and flu symptoms. Again, appropriate research and consulting a physician can help you determine what’s best.

Folk tinctures are a great way to get started with herbalism and connect with new plants. Whether you’ve grown and gathered herbs this season or are ordering them online, this guide will help you create your own tinctures using the folk method.

Beginners Guide to Seed Saving

Southern Exposure strives to promote everyone’s right to save seed. We know that many backyard gardeners don’t have the time, space, or desire to save all of their own seeds, but we love seeing gardeners try to tend a variety or two. The pandemic further reinforced just how important seed saving is. We saw a surge in sales, especially of staple crops like corn and beans. Seed saving is easier than you think! Follow this beginner’s guide to seed saving to get started saving your favorite varieties.

Selecting Varieties 

If you’re going to save seed, it’s essential to save it from the right plants! Hybrid plants are the first-generation crosses of two different parents. If you try to save seed from these crops, it probably won’t be true to type, meaning that the plants may be different in appearance, flavor, or other characteristics than that hybrid you grew.

Open-pollinated

Open-pollinated varieties are the crops you want for seed saving. These stable varieties have been bred to produce the same crop year after year reliably. You may notice that some open-pollinated seeds are listed as heirlooms. 

Heirloom

The word ‘heirloom’ does not have a strict definition, but it’s generally used to reference open-pollinated varieties that have been passed down from generation to generation. Southern Exposure considers varieties to be heirlooms if they were bred before 1940. 

Planning Your Garden

If you’re a small gardener hoping to save a few seeds this fall, you don’t necessarily need to have done any special planning. However, planning a garden for seed saving will improve your success.

Isolation Distances

When preserving varieties, you need to prevent them from crossing. You probably know that an Amish Paste Tomato could cross with a Radiator Charlie’s Mortgage Lifter Tomato, but there’s more to it than that. Plants in the same family can also cross. Cabbages for instance, could cross with broccoli, kale, Brussels sprouts, and other crops in the brassica family.

Crops need to be isolated to maintain varieties. Isolation can be achieved by distance or succession planting so that the crops aren’t blooming simultaneously. You can find isolation distances for different crops here.

Seed growers may also achieve isolation by covering blooms with bags and hand pollinating or growing in high tunnels. 

Population Size

Diversity is key! To maintain genetic vigor, you need a large enough population to preserve genetic diversity. Saving seed from a single pepper plant may be fine for a year or two, but it isn’t a good long-term idea.

Learn more about garden planning for seed saving with this fantastic post from SESE seed grower Debbie Piesen of Living Energy Farm.

Garden Planning for Seed Saving

What to Look for When Saving Seed

When you save seed, you’re determining the next generations of that crop’s characteristics to an extent. Generally, if you’re trying to maintain a variety, you want to save seeds from those plants that display the typical characteristics of that variety or are true-to-type. 

However, you may also want to select for certain characteristics. For example, you may want to save seed from tomato plants that displayed the highest resistance to late blight. 

There are several characteristics you can select for, including:

  • Trueness-to-Type
  • Earliness
  • Vigor
  • Cold Hardiness
  • Color
  • Stockiness
  • Drought Tolerance
  • Disease or Pest Resistance
  • Lateness to Bolt
  • Flavor
  • Uniformity or Lack of It
  • Size & Shape
  • Storage Ability
  • Productivity

Consider marking certain plants you know have some of the desired characteristics. That way, you can be sure you’re gathering from the correct plants when it’s time to harvest seed. 

Seed Saving from Annuals

Many of the crops we save seed from are annuals. Their life cycle takes place during a single season. They start as a seed in the spring and produce seed by fall. 

These are excellent choices for beginner seed savers. They include squash, beans, cucumbers, tomatoes, corn, peas, basil, and more. 

Harvesting

When harvesting for seed saving, remember that some crops will need to mature beyond what you would typically allow for eating. For example, cucumbers should be fat and yellow, jalapeños should be red, and sweet corn should be dry and hard. 

Fermenting Seed

Some seeds have a gelatinous coating that you’ll need to remove before drying and storage. In the wild, this coating will help preserve the seed and temporarily inhibits germination as it lies on the ground until the following spring. In a garden setting, we want this coating gone before planting. Crops with this coating include:

  • Cucumbers
  • Tomatoes
  • Squash

To remove this coating, place your seeds into a jar or container and cover them with water. The containers need airflow, so don’t put a lid on. However, you can cover them with a cloth or coffee filter and a rubber band to keep out fruit flies. 

 Let this mixture ferment for three days, stirring it once a day. It’s okay if you notice some mold growing on top. After three days, add more water and stir the mixture again. The viable seeds will sink while the pulp and bad seeds will float, and you can pour them off the top. Drain your viable seeds.

Drying Seed

No matter what type of seed you harvest, you want to ensure it’s fully dry before storing it. The seed should be dry and brittle. Larger seeds, like pumpkin seeds, should snap when you bend them, not flex. Smaller seeds should crush under pressure instead of flexing.

After adding your seeds to a container, check it regularly for the first week or two. If you notice any condensation inside the jar or other signs of moisture, remove your seeds and dry them further. 

Biennials

Biennial crops require two growing seasons to reach maturity and produce seed. They need to go through a cold period called vernalization to produce seed. These include beets, Swiss chard, bulb onions, cabbage, collards, Brussels sprouts, kale, broccoli, carrots, turnips, and others.

Many biennial crops can survive temperatures into the 20°Fs. In parts of the south, you can easily overwinter them. However, further north or in the mountains, they may need heavy mulch or season extension like high tunnels or row cover. In the far north, you may need to pull plants once they go dormant and bring them into a cool space like a root cellar before replanting them in spring. Read more about saving seed from biennials here.

Ira Wallace shells Blue Clarage Corn (share seed)Storing Seed

Ideally, it would be best if you stored seed somewhere cool (about 50°F), dark, and dry. You can use seed packets that you’ve made or like those we offer on the website. You can also use mason jars or other containers you have on hand. 

Label everything with the variety and date you stored or last tested your seed.

Testing Seed

You can do a simple germination test at home to ensure your seeds are still good before planting time. Take ten seeds and place them folded into a damp paper towel in a container or bag (to help hold in moisture). Set your container in a warm place. 

The amount of time you’ll need to leave them will, of course, depend on how long whatever type of seed your testing requires to germinate. Be sure to keep the paper towel damp. You may have to sprinkle water on it if it begins to dry out. 

The number of seeds that germinate will give you a rough idea about their germination rate, and you can plant accordingly. If you have a lot of seeds, testing more than ten will give you a more accurate percentage. Even if only half germinate, you still use your seed; just be sure to plant thickly in the case of direct seeding or multiple seeds per cell when starting indoors. 

Saving seed from even a single variety can help you become more self-reliant, expand your knowledge of plants, and deepen your relationship with your land. We firmly believe that seed saving should be available to all. Follow this guide to become a seed steward.