Fermenting food is actually one of the oldest and safest methods of food preservation. Despite this fermenting food as a means of food preservation has largely been replaced by canning and freezing. While fermented foods may require a little extra care and attention they are still pretty easy to make and are beneficial to eat. Eating a diet that includes fermented foods promotes healthy gut flora and good digestion.
Fermented cucumber pickles are an easy way to get started with fermented foods and they’re just as tasty as home canned ones! They’re also easy to make in small batches, perfect for people with smaller gardens.
Here’s what you’ll need:
fresh cucumbers
filtered water
salt
onions
spices (dill, pepper, garlic, etc.)
jar or crock
crock weight
*optional – grape leaves
Directions
Rinse your cucumbers and remove any that are bruised or damaged. If you’re making a large crock and can fit them in whole they’re ready to go. If not slice your cucumbers however you desire. Spears and slice both work fine.
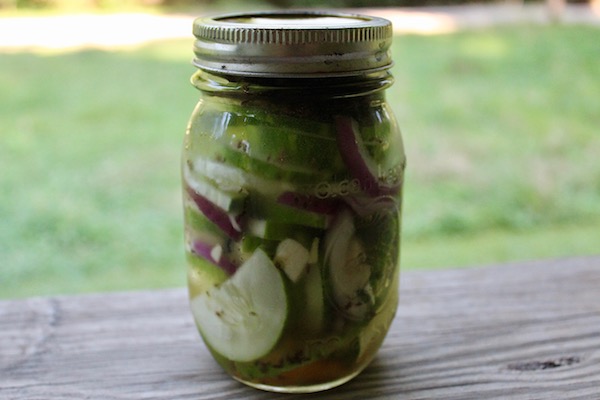
Mix your cucumbers, onion slices, and spices and pack them into your jar or crock leaving an inch or so of head space.
Don’t worry that the recipe isn’t specific. It doesn’t matter! Unlike canning you can mess around with ingredients without making your food unsafe. If you’re not sure what spices you’d like small batches are wonderful for trying different combinations.
In a quart jar mix 1 1/2 TBS salt and water until the salt is dissolved and pour over your cucumbers. Repeat this process as needed until they’re completely covered.
Place some sort of weight over your cucumbers to hold them under the water. You can purchase a crock weight, use a plate, or use a clean rock. In my mini batch pictured above I washed a small rock and used it.
If desired you can also layer clean grape leaves over the top of your cucumbers before weighing them down. The grape leaves help keep the air away from your cucumbers and the tannins in them help the cucumbers stay crisp.
If you’re using a jar you can now lightly put the lid on. Don’t screw it down tight. If gases can’t escape your jar will explode. If using a crock you can lay a clean towel or cloth over it. Let your pickles ferment for 2-3 days on the counter.
Once they’ve fermented they can be moved to cold storage like a refrigerator or root cellar and they’ll last for months!
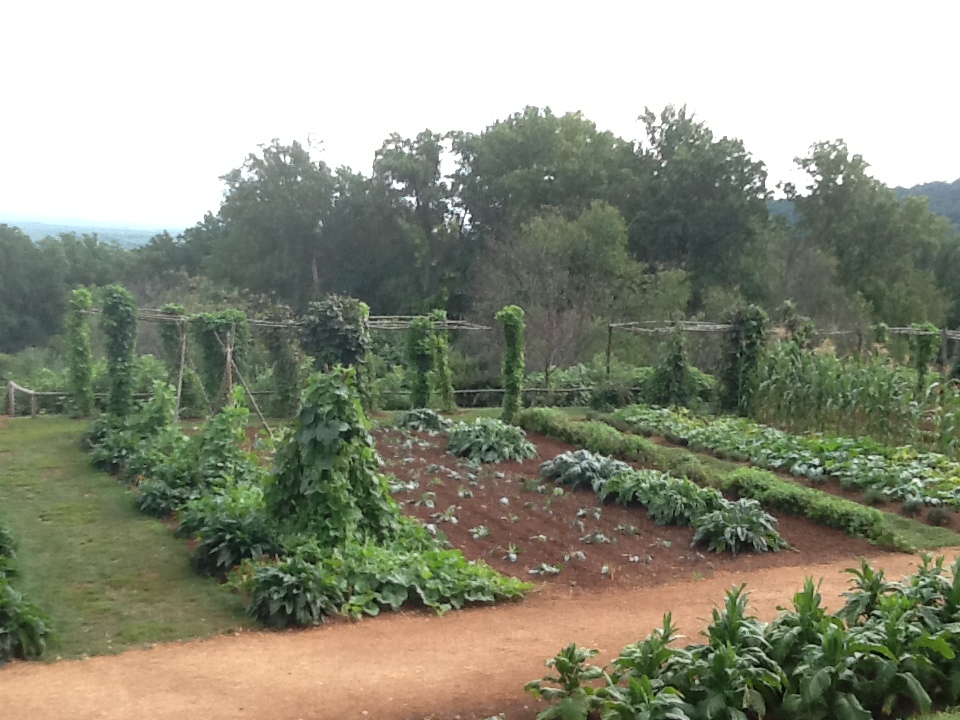
Traditional wooden vegetable garden trellising at Thomas Jefferson’s Monticello
In my dreams of a picturesque garden there are always trellises. They may bring to mind quaint little fairy tale cottages, but trellises aren’t just for their good looks. There are so many plants that can be grown on a trellis and so many reasons to grow them that way.
Why trellis?
Trellising saves resources.
Want to grow more vegetables in little spaces? Grow up! One of the easiest ways to make the best use of small garden spaces is by growing plants on trellises. Plants like pole beans are extremely productive and can be grown in narrow rows if trellised.
Trellised plants also use less water. Instead of watering an entire sprawling plant you can just water the base where the plants roots are located.
Trellises add structure.
Adding structure and height to a garden is often done to make gardens more beautiful. but there are other benefits too. Song birds will appreciate having places to land in your garden and they can help control insect populations.
Having the plants up off the ground also increases air flow and can help minimize plant diseases.
Trellises add shade.
Trellising plants can also help you add much needed summertime shade. A vining vegetable crop like cucumbers can be grown on a slanted trellis above a bed of a cool weather vegetable like lettuce, thereby helping you to grow a late season crop. Deciduous perennials (those that drop their leaves in the fall) can be grown on trellises on the southern side of houses to shade the home in the heat of summer and let the sun through in the winter. Some plants, like pole beans, gourds, and flowers like morning glories, have such long vines they can easily cover small structures (like teepees) making excellent summer forts for kids.
Trellised plants are easier to harvest.
Vegetables on trellises also tend to be easier to harvest. Instead of searching through a sprawling jungle of squash plants, you can easily spot them hanging from a trellis. Plus there’s little or no bending over. The fruits also tend to be cleaner and more uniform, perfect for market growers.
What can be trellised?
Decorative wrought iron trellis at Atlanta Botanical Garden
Many plants do well on a trellis and some require one. Below are some of the vegetables, flowers, and perennials that make ideal candidates for trellising.
There are tons of trellis designs and it can be hard to choose. The major deciding factors will be your garden’s style, your budget, the materials you have on hand, and which plants you plan to trellis. Trellises can be whimsical, practical, or a mix of both. They can be shaped as arches, forts for children, or simple fences.
Use natural materials.
Many people choose to make simple teepees like these which can be made from bamboo, straight saplings, or branches, and held together with twine or wire. There are also many different shaped designs using the same materials.
Use fencing.
Cattle panel arch trellis at Heritage Farm
Hog panels or sections of wire fencing are another popular choice. Hog panels and sturdier fencing can be used two ways: as a fence or bent over as an arch.
Purchase or build trellises from lumber.
If you have money to purchase trellises or a knack for woodworking, there are designs for folding trellises that can be stored each season as well as more creative designs. You can also install large trellises in front houses or over patios.
Repurpose junk.
Some people also repurpose old junk into awesome trellises. Things like iron bed frames and gates, old umbrella frames, and old antennas are great for climbing plants.
When designing any trellis it’s important to think about what you’re growing. Is it a permanent trellis for a perennial that will be in the same spot for years or something you’ll want to rotate next year? You’ll also need to decide on the size. Obviously pea plants require smaller trellises than grape vines. Some plants, like pumpkins, melons, and larger squash varieties, will need sturdy trellises to support the immense weight of their fruit.
How do I trellis plants?
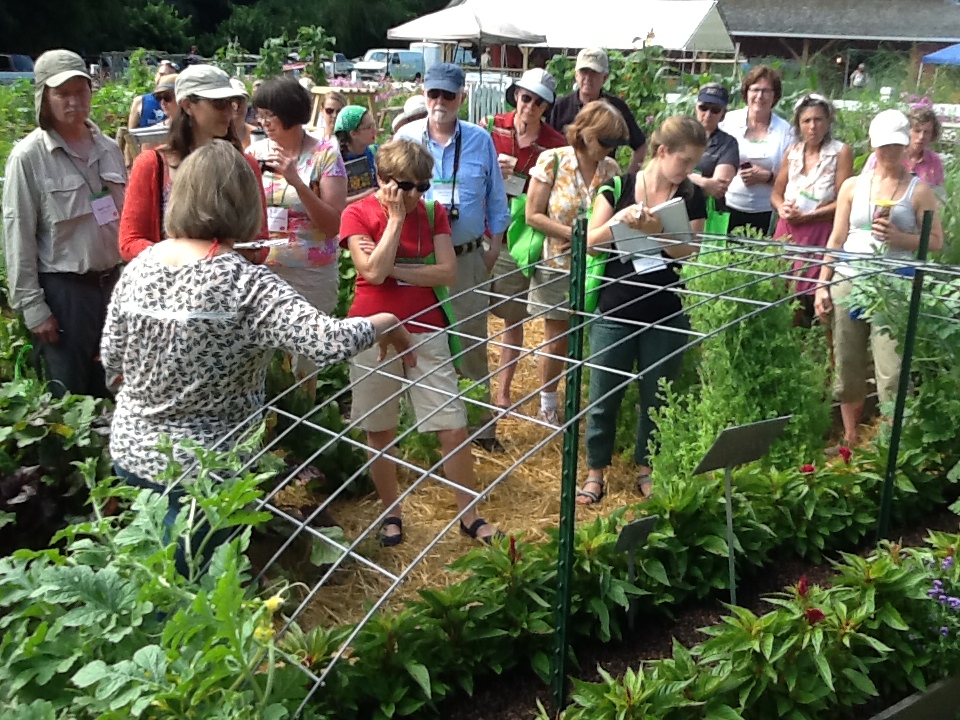
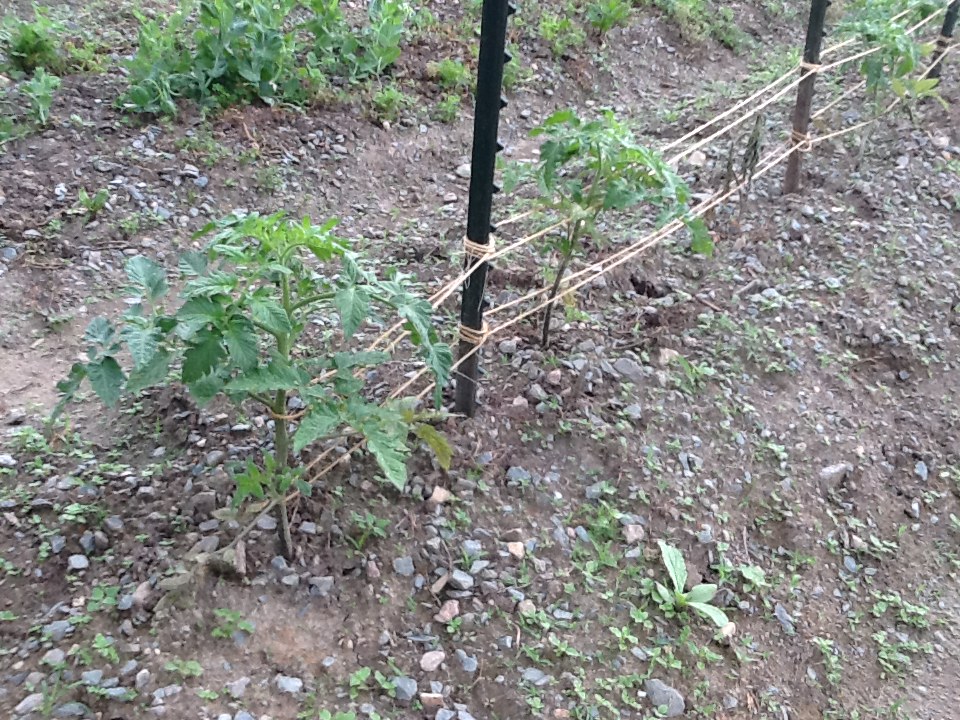
Some plants (including morning glories, beans, and cucumbers) are easy to trellis. Simply sew seeds next to a trellis and they’ll do the work. Some plants, like tomatoes, need a little help: they need to be manually trellised. You can use tomato-specific trellis methods like the “Florida Weave” which surrounds the plants with twine. Or use traditional trellises and attach plants with tomato clips or even old scraps of fabric. Just be sure that your method does not cut into the plant as it grows.
Tomato trellis of string weaving at Twin Oaks Community Farm
For some large-fruited plants like pumpkins, melons, and large squash varieties, you may need extra support. You can create small “hammocks” for each fruit from an old shirt or other stretchy material that can be tied off to the trellis as the vine cannot support the fruit’s mature weight.
If you’re ready for a super productive and beautiful garden this year it’s time to get some trellises ready! The best time to add trellises is before planting, not after, so don’t delay! It’s finally spring and setting up trellises is a great way to get out in the garden.
Want to know more about trellises? Check out these posts:
With summer’s intense heat in full swing, it can be hard to remember to sow cool season crops, but some fall crops need to be started as early as June, and many need to be started in July.
On our farm in central Virginia our average first fall frost falls in late October, but even where frosts come later or not at all you should start fall crops during the summer. Later plantings will struggle with fall’s low light levels, and won’t produce before growth slows to a near standstill in early winter (the “Persephone Days,” November 21-January 21).
To make sense of all the seeds we’re sowing during the summer months, I divide our summer plantings into three types:
1. Warm-season, slow growing summer successions: these are the bonus crops that many gardeners forget. A second round of tomatoes, summer squash, sweet corn, or cucumbers can keep you harvesting all summer long without interruption.
2. Fast growing summer successions: these crops require frequent, regular sowing all through summer. Because we’re sowing so often, these can be easier to remember. We sow beans, carrots, salad greens, beets, and radish seeds weekly. Be ready to baby your summer sowings: we water daily to keep them from drying out before sprouting. Lettuce needs the soil temperature to be below 80 degrees F, so you may need to sow in flats indoors, or even in the refrigerator, or sow in the evening and cool the soil with crushed ice.
3. Cool season, slow growing crops for fall harvest. We sow the Brassicas first: Brussels sprouts in June, and then broccoli, cabbage, and cauliflower in July. By mid-July we’re sowing fall greens: collards, Swiss chard, leaf beet, and kale, plus winter radishes. We sow Chinese cabbage in late July. Sow thickly in nursery beds and keep up with your watering; we protect these young plants from summer’s insects with spun polyester row cover or the new more durable and temperature neutral “proteknet.”
Successions can be overwhelming, so we have some tricks that help extend harvests with fewer plantings:
1. Plant indeterminate varieties of tomatoes and cucumbers, and pole-type beans and peas. We still find we need a late tomato planting, because our earliest plantings taper down toward the end of summer (and our Heritage Harvest Festival at Monticello needs lots of tomatoes for the Tasting Tent).
2. Select heirlooms bred to provide extended harvests: many modern farms want concentrated harvests that can be harvested with one or two passes; but for more traditional growers an extended harvest was the ideal way to manage the bounty. Look for roots that hold well in the ground. Lutz beets are one of our favorites: they can be spring planted and will hold all summer without turning woody. However, they will be very large, so this only works if you’re happy cooking with multi-pound beets (try slicing cross-wise for beet burgers). Open-pollinated broccoli provides extended side-shoot harvests. Choose bolt-resistant greens and harvest by the leaf before before taking whole plants.
3. Choose seasonally appropriate salad greens: we want salads all year-round, but this can be tricky both when it’s hot and when it’s cold! Mustards and brassicas are more mild in cold weather, so get adventurous by adding young kale and tatsoi to winter and early spring salads. Choose cold-tolerant lettuce: red varieties tend to hold up better in frost. For hot weather, choose fast-growing summer crisphead lettuce like Sierra, or heat-ready greens like Red Malabar spinach or Golden purslane.
4. Set up a root cellar or similar storage system. Ultimately, some of your crops will ripen all at once, or you’ll be faced with a glut of produce when frosts threaten. Be prepared: have a proper storage area ready to go for your carrots, parsnips, turnips, cabbages, winter squash, and more. Be ready to finish ripening the last fresh tomatoes indoors. For fresh produce through till spring, we need good systems for storing and slowly working through the harvest. Nancy Bubel’s Root Cellaring is an invaluable resource if you’re looking to improve your winter storage system, and has lots of low-cost and little-time options, if you haven’t blocked off your whole summer to dig a cellar.