7 Medicinal Weeds & How to Use Them

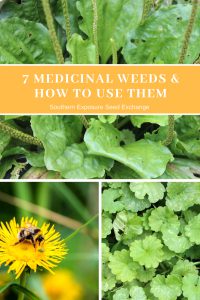
Dealing with weeds may be one of the worst parts of gardening. No matter how diligent you are or how much you cover crop and mulch there will always be a few that get by you and mature. While I’ve often heard gardeners refer to edible weeds with the positive motto, “if you can’t beat them eat them.” It doesn’t always work for me. When I’ve worked hard to nurture a late crop of heirloom lettuce onto our plates, a salad of wild greens just doesn’t have the same appeal. However there are medicinal uses for some of the pesky garden weeds that plague your summer chore list. Here’s a list of common medicinal weeds and how they can be used.

Ground Ivy/Creeping Charlie

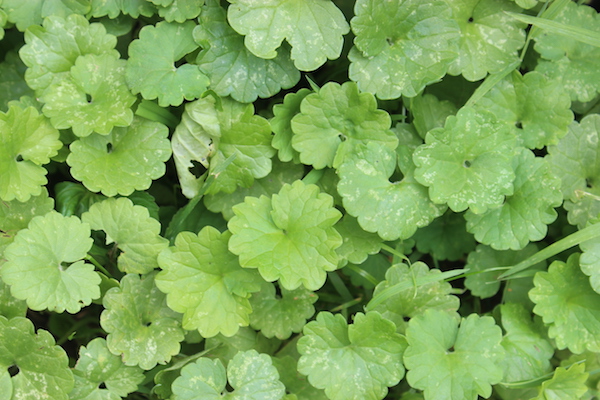
Ground Ivy is edible but not exactly tasty. It has been used medicinally treat a variety of ailments. It’s astringent, anti-inflammatory, and very high in vitamin C. It was once used to treat scurvy. Today you can make it into an immune boosting tea or tincture.

Plantain

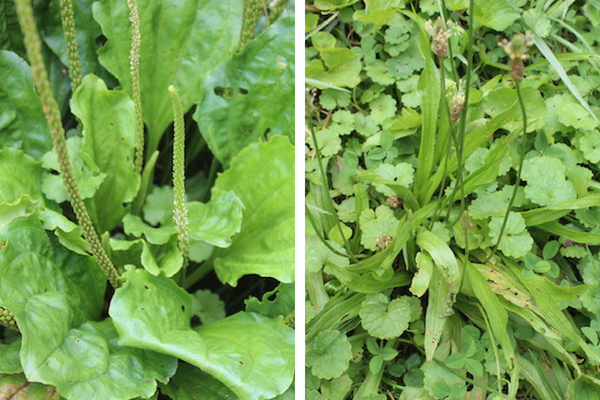
There are two common types of plantain, Plantago major (left) and Plantago lanceolata (right), and both share the same medicinal properties. Plantain leaves and seeds are edible and full of important vitamins but the leaves are most frequently used externally. The leaves have anti-microbial and anti-inflammatory properties and can be crushed and placed on small injuries and insect bites to help soothe and heal.

Chickweed

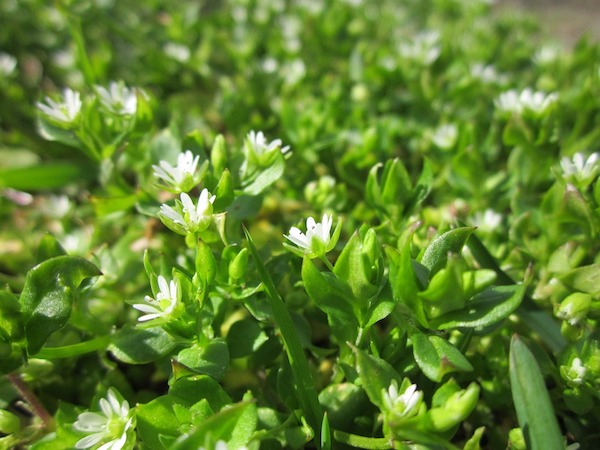
This plant is often used to treat stomach conditions including constipation. It’s also high in vitamin C and can be made into a tincture or eaten fresh.

Dandelion

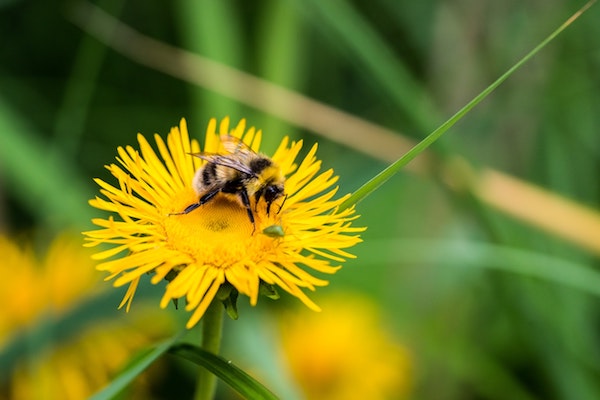
Flowers, leaves, and roots, all parts of the humble dandelion are medicinal. Though it hasn’t been well studied dandelion is believed to help support liver function and balance hormones. The leaves and flowers can be dried as tea, made into a tincture, or eaten fresh. The roots are sometimes ground and dried as a coffee substitute.

Cleavers

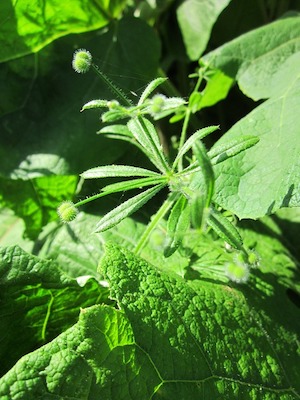
Also called goose grass or bedstraw, this plant is most commonly used as an herbal tea to treat urinary infections and promote kidney health. The plant and its seeds are very good at sticking to clothing.

Wood Sorrel

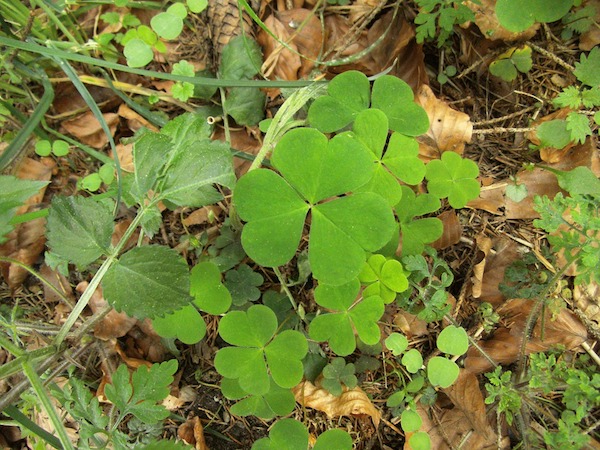
Wood sorrel was once commonly believed to a blood cleanser. It has also been used to treat stomach ailments including vomiting and a poor appetite. Juice from wood sorrel plants is believed to helpful in treating ulcers when used as a mouth rinse. It’s also thought to help treat sore feet when added to a tub of warm water, a perfect use for the busy gardener! Though tasty, it should be consumed in moderation as it is high in oxalic acid which can inhibit calcium absorption.

Lambsquarters

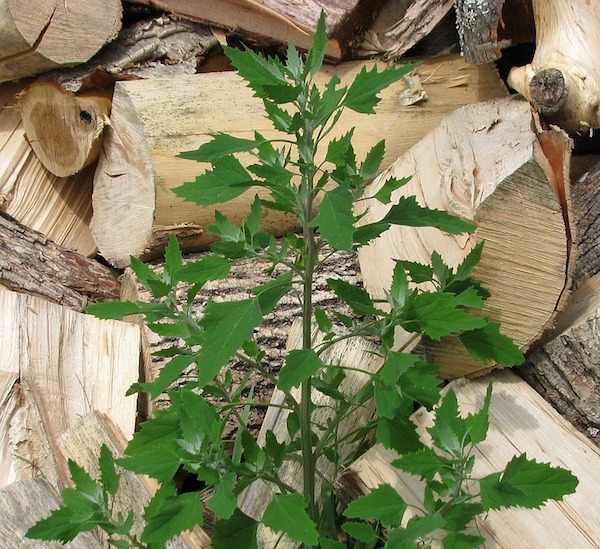
Lambsquarter actually is quite tasty but it can also be used medicinally. Traditionally it was used internally, either eaten fresh, cooked, or made into a tea to treat rheumatic pains and chronic wounds. It’s can also be crushed and used as a poultice to help soothe eczema, sunburns, and insect bites.

Using a few herbal remedies won’t eradicate the weeds from your garden or replace your costly health insurance but maybe it will help you connect with nature. Maybe it will make you a little less sad to see weeds popping up in your garden. What weeds have you utilized from your garden?

I’m not a medical practitioner or herbal medicine expert. Please consult a doctor before trying to use herbal remedies to treat any ailment. Some plants may interact with certain prescriptions or pre-existing conditions.

Pin it for later.

Processing Flour Corn at Home

Kentucky Rainbow (Daymon Morgan’s Knt. Butcher) Dent Corn

Today many people grow flour corn solely for decoration. Flour corn varieties certainly are beautiful but they have so much more going for them than their looks! Many Native American cultures relied on these corns as a staple food. Today they’re still an excellent way to produce and eat a more local diet. They really aren’t difficult to process into delicious cornmeal, flour, or grits.

Harvesting

Most flour corns have two numbers listed for “days to maturity.” The first number or set of numbers is when the corn will be ready to harvest in it’s milk stage like you would sweet corn. You’ll know it’s at this stage when the tassels turn brown. It won’t be nearly as sweet as modern hybrid sweetcorn however it’s still quite tasty when roasted with butter. The second number or set is when your corn will be fully mature and ready to harvest for flour. The husk should be papery and dry.

You should harvest your corn on a dry day before your first fall frost. Then you can pull the husk back from the corn and hang them so the kernels can finish drying completely. Traditionally corn husks were sometimes braided or tied together to hang the corn in small bundles. You’ll know when the corn is completely dry because the kernels will crack instead of squishing under pressure. 

It should be noted that gourd seed and popcorn varieties can also be processed into flour and Native Americans often used them this way.

Shelling & Winnowing

When your corn is dry it can be processed. The first step is to shell your corn. This can be done by hand or with a corn sheller. Doing it by hand can be time consuming and tiring if your doing anything but a very small quantity. At SESE we offer two handheld corn shellers, one for flour corns (above right) and one for popcorns. You can also sometimes find larger corn shellers like the one pictured above left at antique stores, flea markets, or auctions. 

Once your corn has been shelled odds are they’ll be bits of corn cob mixed in which is also called chaff. To remove this you’ll need to winnow your corn. Don’t worry though it’s easy and there’s no special equipment required. Simply place a quantity of your corn into a large bowl or bucket. Then place an empty one in front of a fan. A household box fan will work perfectly. Then slowly pour your corn into the bucket in front of the fan. The fan will blow away the lighter pieces of material while the corn will fall into the other container. You may have to repeat this several times before the corn is clean.  

Nixtamalization

It may seem like you should now be able to just grind your corn and eat it there’s actually another step. In order to get the all the available nutrition from corn it needs to be nixtamalized. Traditionally this was done by soaking or boiling the corn in lime water. Native Americans in North America used wood ash for this but today it’s common to use pickling lime which should be easily available with home canning supplies.

Here’s what you’ll need:

  • 1/8 cup of pickling lime
  • 1 1/2 quarts of water
  • 1lb corn

Pickling lime is caustic so rinse it off quickly if it gets on your skin and avoid getting any in your eyes. Be extra careful if there are small children around.

Dissolve your lime in your water and combine the lime water and corn and bring them to a boil. Avoid aluminum pots as they react with the lime. Turn off the heat and let your corn soak overnight. In the morning rinse your corn well in a stainless steel colander. While it’s rinsing rub off some of the corn’s outer layer (this will give you a finer flour).

The corn can then be used whole in soups or stews or ground into flour. Depending on what you’re using to grind your corn you can grind it wet or dry it to grind later by laying it out in a single layer on a screen or using a dehydrator.

For a more in depth look at the history and importance of Nixtamalization check out this article from Cook’s Illustrated.

**For most people this corn isn’t going to make up a large part of your diet so it won’t be harmful to skip this step if you feel you need to.

Grinding

Traditionally corn was ground in a mortar and pestle or with a grinding stone. Thankfully today there are a variety of home grain mills available that are suitable for grinding corn. You can find ones that are hand crank or electric, ones with stone grinding wheels and ones with metal, and mills that can handle wet, oily products and those that can’t. What you choose will depend on your budget and goals. 

Depending on what you’re hoping to make with your corn (like fine flour for tortillas or courser corn for grits) you’ll need to set your mill to achieve a specific coarseness. 

Some mills may require more passes to produce fine flour. If your mill is taking multiple passes it may be helpful to strain the corn through a wire mesh colander and run the larger pieces back through separately rather than the entire batch.

Storage

If you grow an ample amount of corn your going to want to store some for later. Flour corn is best stored at two stages. First it can be stored on the ear once it’s completely dry. You can even leave it hanging if you want. Alternatively, to save room you can store it in containers after it has been shelled and winnowed. It will stay fresh much longer as whole kernels than if you grind it into flour. 

Adding flour corn to your backyard garden is a great way to produce more than just fresh produce for yourself. It’s easy to grow and store for use throughout the year and making your own grits or tortillas can be a great family activity. 

Pin it for later.

Heirloom Fibers: Growing Colored Cotton

In the United States cotton is deeply tied to its role in slavery and the atrocities committed against African slaves. Gardeners growing cotton today get an important piece of living history. Slaves were forced to cultivate acres of cotton and harvest the fiber from sharp bolls all day long in the hot sun. While no one can truly imagine the horrors African slaves went through growing cotton can help keep their story alive.

It’s also worth noting that before cotton was ever grown in the United States it was cultivated for thousands of years in Africa, Asia, and South and Central America where different varieties were first domesticated. We tend to think of Europeans and their descendants who colonized North America as having bred this important important fiber crop when in fact they’ve played a relatively small role in cultivating different cotton varieties. It was instead Africans, Asians, and Native Americans that were the original cultivators of cotton including many colored varieties.

Colored Cotton

Arkansas Green Lint Cotton

Thanks to commercial farming operations if you ask most people what color cotton is they’ll say white. In reality cotton cultivars come in many colors including brown, blue, pink, green, red, and tan. At Southern Exposure we offer 6 cotton varieties including green, brown, tan, and white varieties. In the United States these colored varieties were sometimes grown by slaves prior to the Civil War for use in their own clothing as they were not allowed to grow the same white cotton as their masters.

While these older, colored varieties are certainly beautiful most of them have a shorter staple length than most modern varieties making them less than ideal for industrial spinning operations. For this reason commercial growers solely grow white cotton and colored cotton varieties are now relatively rare.

This doesn’t mean that colored and heirloom varieties don’t have benefits though. First many of these heirlooms are more drought tolerant and pest resistant than their modern cousins and even though they cannot be spun on an industrial scale they can be used by home spinners and small crafts people. Their natural color also means there’s no need to dye them. Today chemical dyes used for clothing are a major source of water pollution.

Why Grow Cotton?

  • Growing cotton can help connect you with important history even if part of that history is a negative.
  • Cotton is a wonderful ornamental plant and can be used in bouquets at the flowering stage or when the bolls mature.
  • It’s relatively easy to grow and drought tolerant.
  • It can be used for truly homegrown and handmade crafts.
  • Growing an heirloom cotton helps keep biodiversity alive. These varieties may be important for breeding future varieties. Whether it’s breeding colored cottons with longer staples lengths for mechanized spinning or cottons that are more resistant to certain pests.

Cotton is annual and can be direct sown in zones 8-10 after danger of frost has past. Though cotton isn’t grown commercially in the northern United States it can in fact be grown there with a little extra effort. In northern climates (zones 7-5) cotton should be started early indoors like tomatoes or peppers and transplanted out because it is frost sensitive and takes 130 days to reach maturity. For more detailed growing information check out the Southern Exposure Seed Exchange Cotton Growing Guide.

*Note: Some states including Virginia require growers to have permits in order to grow cotton. Please check with your local extension agency. 

Pin it for later.

Saving the Past for the Future