10 Easy-to-Grow Heirloom Flowers

When most people think about planting heirlooms, they think of colorful, quirky tomatoes and other vegetables. Of course, we love heirloom veggies, but there’s a lot to love about heirloom flowers too! Growing them helps support pollinators, wildlife, and beneficial insects. It also preserves biological diversity. Here are ten easy-to-grow heirloom flowers that are perfect for beginners.

Poppies

Poppies are one of our favorite flowers to fall sow. These cool weather loving beauties can also be sown in early spring. They germinate best when soil temperatures are around 60°F and are quick to bring beauty to the garden.

Poppies are an excellent choice for gardeners trying to maximize their garden space. They provide incredible, early-season beauty and seed pods later in the season. The seed pods make lovely additions to dried arrangements and wreaths, and the seeds inside the pods are edible and perfect for baked goods and salad dressings.

Cosmos

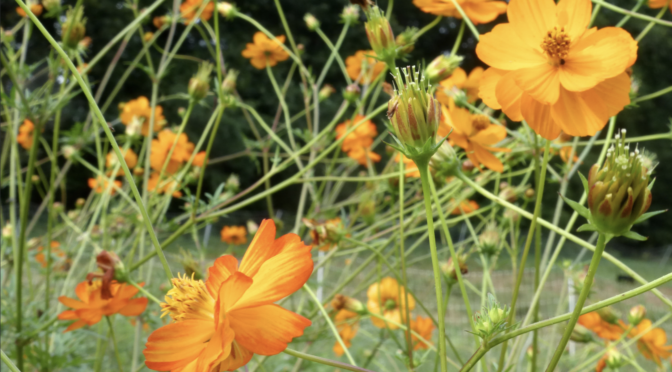
Cosmos are some of the least finicky annual flowers. They’ll tolerate poor soils, partial shade, and drought once established. Direct sow cosmos when the soil is about 70°F after all danger of frost has passed or start them indoors about 4 to 6 weeks before your last frost for earlier blooms.

Some of our favorite heirloom cosmos include Mexican Cosmos, Sensation Mix Cosmos, and Mona’s Orange Cosmos (pictured above). They have a long bloom period, and deadheading encourages them to continue. They’ll also help to attract pollinators and birds, which eat the seeds, to your garden. The petals of Cosmos sulphureus are edible.

Zinnias

Zinnias are the queens of the cut flower garden. The great thing about zinnias is that the more you cut, the more they’ll keep blooming. If you’re not using them for cut flowers and just want to enjoy them in the garden, keep up with deadheading to prolong their bloom period.

We carry two heirloom zinnias Peruvian Red and Peruvian Yellow. They’re both easy to direct sown after your last frost. They can also be started indoors and transplanted out after your last frost date for earlier blooms.

Sunflowers

Don’t think of sunflowers as ordinary. There is so much variation in sunflower varieties. From the frosted looking Silverleaf Sunflower to the towering 7 to 9 foot stalks of the Seneca Sunflower to the brilliant blooms of Red Torch Tithonia there’s something for everyone.

Sunflowers are easy to grow, and a great choice for gardening with young children; their large seeds are easy to sow. Larger varieties also make excellent trellises for pole beans and other vining plants.

Hollyhocks

These tall spikes of flowers are biennial, meaning they bloom the second year. They can be started indoors or direct sown. Plant hollyhocks in areas that receive full sun. Check out our post Cottage Garden: Growing Hollyhocks for more instructions. 

Especially in windy areas, hollyhocks may need staking to prevent lodging. You can also grow them along a fence and use twine or fabric to secure them as they mature. Hollyhocks will self-seed and if allowed to naturalize in a bed, can provide blooms every year. 

Heirloom Flowers (Grandpa Ott's Morning Glories)

Morning Glories

An old favorite, morning glories produce vigorous vines climbing up to 15 feet! Their trumpet-shaped flowers are excellent for attracting pollinators, and they look fantastic climbing fences and porch railings. They can be grown in the garden or in large containers. 

Morning glories should be planted with a trellis where they’ll receive full sun. Soak seeds two days before planting, changing the water every 12 hours for best results. Then direct sow or transplant them after frost.

One of our favorite morning glories is Grandpa Ott’s Morning Glory (pictured above), a family heirloom from Diane Ott Whealy. This variety is one of the original varieties that started Seed Saver’s Exchange and the whole heirlooms movement. 

Asters

While there are some perennial asters, the heirloom aster we carry, Crego Giant Mixed Colors, is a large annual. They grow up to 3 feet tall and make excellent cut flowers.

Asters can be easily direct sown or transplanted. They germinate best when the soil temperature reaches 70°F and should be planted after your last frost in a spot that receives full sun.

Love-Lies-Bleeding (Amaranth)

Crimson tassels up to 24 in. long “drip” from these showy plants. Love-Lies-Bleeding looks excellent in floral displays, whether fresh or dried. 

This striking heirloom requires little care. Direct sow Love-Lies-Bleeding after the danger of frost has passed. It should be planted in full sun and is rather drought-resistant. Larger plants may benefit from staking for the best display.

Coreopsis

A native perennial, coreopsis is excellent for attracting pollinators and birds to your garden. It’s also a great natural dye and yields a broad range of colors. 

Coreopsis is an annual plant, but it self-sows readily and will naturalize in meadow plantings. Direct sow or transplant out coreopsis after danger of frost has passed in full sun or partial shade. 

Jewels of Opar (Fame Flower)

This purslane relative is easy to grow and has a multitude of uses! The mild, succulent leaves are great in salads and sandwiches or as a spinach substitute. Native to parts of the South and the Caribbean, it also has a history of medicinal use. The seed stalks are great additions to dried arrangements with seed pods that dry to shades of orange, red, brown, gold, and grey.

Transplant or direct sow Jewels of Opar after all danger of frost has passed. Self-sowing readily, Jewels of Opar may naturalize. It’s perennial in zones 8 and up.

Find out more about growing Jewels of Opar here.

Growing heirlooms helps preserve biodiversity and makes your garden unique! Plant a few of these ten easy-to-grow heirloom flowers this season. 

Seed to Storage: Success With Peppers

Peppers are one of the best plants to learn to start from seed. Growing from seed rather than just purchasing transplants allows you to access a wide range of unique varieties that you won’t find in stores. Here are some tips for success with peppers from seed to harvest and beyond. 

Selecting Pepper Varieties

We carry many pepper varieties at Southern Exposure, which we separate into three basic categories.

  • Hot Peppers
  • Seasoning Peppers
  • Sweet Peppers

They fall into three species: Capsicum annuum, Capsicum chinense, and Capsicum baccatumC. annuum includes most peppers easily found in the U.S. and almost all sweet peppers. 

C. baccatum and C. chinense are generally more disease-resistant than C. annuum

C. annuum generally has thicker walls, so it adds more bulk to sauces. C. chinense has the thinnest walls, but C. baccatum tends to be the easiest to dry. 

While any hot pepper has its heat mostly in its seeds and ribs, the heat of C. chinense is relatively more dispersed, and the heat of C. baccatum is especially concentrated in the seeds. C. baccatum and C. chinense generally have very fruity flavors that complement sweet as well as savory dishes.pepper seedlings

Starting Seeds

Starting peppers seeds is easy as long as you follow some basic guidelines. Start pepper seeds indoors 8 to 10 weeks before your last frost. 

Start your pepper seeds in proper potting mix. Potting mix drains better and doesn’t compact like ordinary garden soil. It’s also best to start peppers in well-draining trays or soil blocks. Sow seeds about 1/4 inch deep.

Pepper seeds require warm temperatures to germinate. They do best when kept between 75 and 80 degrees during the day and at least 65 at night. Temperature can make the difference in peppers germinating in 5 days or 20.

Placing your seed starting set up in a warm room will help you seed peppers coming up faster. You can also purchase seedling heat mats that the trays sit on. This provides steady, even warmth to your seedlings.

Your seedlings also need a good light source once they’ve germinated. Setting seedlings in a window doesn’t provide enough light. You can use grow lights or other re-purposed lights. The long ones you’d find in a shop or basement work well for doing multiple trays of seedlings. 

Peppers need an uncrowded root system for maximum production. Pot your peppers up to 3-inch pots when they develop a few leaves. You may need to pot them up again if your seedlings become large.

Transplanting

Harden off pepper seedlings before transplanting out. Hardening off allows plants to acclimate to field conditions like wind and sun exposure slowly. Begin by moving your pepper plants outdoors for an hour or two each day on warm days. Gradually increase the time you leave them out over a week or two before transplanting. Don’t let your seedlings wilt!

Wait until it has really warmed up to transplant your peppers. Plant them out after the dogwood blossoms have fallen or the soil temperature reaches 65°F. Ideally, transplanting should be done on an overcast day. 

Space your plants in rows or blocks 18 to 24 inches apart. Especially if you have less than ideal soil, it’s a good idea to dig a larger transplant hole than necessary and add some finished compost. Then plant your peppers so that the soil is at the same level as in the container. If you used peat pots, tear off the tops, so they don’t stick up above the soil and wick moisture away from the roots. harvesting banana peppers

Pepper Care

A month after planting, it’s a good idea to mulch around your peppers. Avoid doing this earlier as it can keep soil temperatures too cool for good growth. The mulch will help keep the soil moist and suppress weeds.

Pepper plants can be side-dressed with fertilizer when they’re young. Avoid getting any on the roots, stem, or leaves as it can burn the plant. Over-fertilizing should be avoided. Read application rates carefully. Don’t fertilize after plants have flowered, as this can cause the flowers to drop and fail to set fruit. Good levels of phosphorus in the soil are essential for good yields. 

Stake larger pepper plants to avoid logging, particularly if they are heavy with fruit. You can also use tomato cages.

You can extend your season by covering your plants at night for 1 to 2 weeks during mild frosts. Before the first hard frost of the season, pull plants and place the roots in a bucket of water. Store in a cool location to extend the season by up to one month. 

Harvesting Peppers

Peppers can be harvested green however they aren’t fully ripe at this stage. You can eat peppers at any stage of ripeness, but fully ripe peppers have more flavor and nearly double the vitamin C content.

Hot peppers generally get hotter as they ripen. For example, a red jalapeño will be spicer than a green one.

Preserving and Using Peppers

There are many ways to use and preserve peppers. Many seasoning peppers like the Hungarian Paprika Spice Pepper have thin flesh and are ideal for drying. Depending on your climate, they can be air-dried on screens, threaded and hung, or dried in a dehydrator. Then you can grind them to make an excellent seasoning.

Pickling peppers is also a simple, common way to put up a large harvest. Pickled peppers go well on pizzas, sandwiches, and salads. Sweet Banana Peppers and Jalapeños are common choices, but it also works with other varieties. You can find instructions here.

Fermenting is another common way to use peppers. Making your own hot sauce is a delicious way to spice up a variety of meals. Try this recipe from Soul Fire Farm.

You can also freeze peppers. Peppers don’t need to be blanched, so you can just chop them or cut them into strips and freeze them. Freezing them in a single layer on a cookie sheet before transferring them to a bag or container keeps them from clumping together for easier use. For a fun night and a bit of extra flavor, you can also roast peppers over an open fire before freezing.

Starting a Cottage Garden

If you’ve been dreaming of flower gardens of spring, odds are you’ve come across enchanting images of care-free looking cottage gardens. Their vibrant colors and seamless blend of plants are a pleasure to look at, especially in the depths of this cold winter! If you’re considering creating a cottage garden on your property this spring, here’s a bit of advice.

How to Start a Cottage Garden

Like so much of gardening, building a cottage garden is an exercise in patience. Many of those beautiful cottage gardens you see on Instagram and Pinterest have been created over years. Gardeners slowly adding perennials, shrubs, and self-sowing flowers as they hone their style and skill through trial and error.

Plan to start small. Choose a few of your favorite varieties and maybe a shrub or two. You don’t want to spend tons on seeds and plants only to realize it’s too much for you to care for or some aren’t suited to your garden or style. 

Find friends or local gardeners who have similar tastes. You can swap seeds, cuttings, and perennial divisions with friends to help expand your garden more quickly and affordably. 

If you have a large area that you’re set on planting, consider seeding a section of it in a wildflower mix. Mixes are great for pollinators and other wildlife. They also allow you to try many new flower varieties and are generally low-maintenance.

Red Drummond Phlox for a Cottage Garden
Red Drummond Phlox

Flowers and Plants for Cottage Gardens

One of the best things about cottage gardens is that there are no hard rules. You can play with the varieties you enjoy. Don’t be afraid to try blending in a few herbs or even vegetables. Here are just a few of the types that spring up in many cottage garden scenes:

  • Hollyhocks

    These biennial flowers invoke images of English countryside gardens. We carry Outhouse Hollyhocks with a mix of deep red, pink, and white blooms and Black Hollyhocks with satin blue-black flowers.

  • Strawberries

    Strawberries make a beautiful, spreading ground cover with leaves that turn red in the fall. They’re fun for children and adults alike to snack on as a they wander through the flowers.

  • Bee Balm

    Bee balm is also called bergamot or monarda. This unique-looking native flower is medicinal and a favorite of hummingbirds. It prefers moist soil and will thrive in partial shade.

  • Daffodils

    The quintessential spring flower, daffodils, are great naturalizing bulbs to tuck into your garden next fall. They bring cheery, early color to the landscape. 

  • Delphinium

    Also called Larkspurs, these annuals bring a lot of color to cottage-style gardens. The name Delphinium originated with the ancient Greeks. It’s derived from the Greek word “Delphis,” which means dolphin. The Greeks thought that the flower bud resembled the shape of a dolphin’s nose.

  • Echinacea (coneflowers)

    Hardy, native, medicinal, self-seeding, and great for attracting pollinators, these native flowers are a must-have. Note that when starting seeds indoors, echinacea seeds do best when they go through cold stratification. We carry four varieties at SESE. 

  • Sweet Peas

    These spring beauties are a favorite for cottage gardens. They add splashes of color and height early in the season, but you’ll need a sturdy trellis.

  • Lavender

    Fragrant and medicinal, growing lavender from seed is worth the effort. We carry perennial English Munstead Lavender, which looks excellent in solitary clumps or lining pathways.

  • Foxglove

    These towering spires of colorful bell-shaped flowers look like something out of fairytale. They’re ideal for adding height to beds.

    All parts of foxglove are toxic. Be careful planting these in gardens visited by young children and pets.

  • Chives

    Chives are both tasty and beautiful. Their subtle purple flowers look great mixed with other brilliant colored flowers.

  • Phlox

    There are many species of phlox that come in a range of colors and heights. The Red Drummond Phlox that we carry is good for pollinators and adding color to the fall garden. The blooms are very hardy surviving down to 20°F.

  • Thyme

    Creeping Thyme’s lemony aroma and creeping nature make it an excellent ground cover for cottage gardens and rock beds.

  • Swiss Chard

    Chard’s lush, deep green leaves add an edible element to your flower garden and look stunning throughout the summer. For a splash of color, consider Prismatic Rainbow Chard or Ruby Red. Fordhook Giant Chard is an excellent choice for larger visual interest.

There are a few additional considerations when selecting varieties. Choose varieties with varying bloom times to keep your garden looking lush and colorful all season. You also want to look at what conditions they grow best in, such as partial shade or sandy soil.

You may also want to repeat colors or patches of specific varieties to help create a cohesive look throughout your garden.

Other Additions

In addition to the plants, trees, and shrubs, cottage gardens frequently contain other features to give them interest. You’ll see gardens with winding pea gravel pathways, fountains, birdbaths, trellises, and fences. As each cottage garden is as unique as its gardener, you can feel free to use whatever elements speak to you, whether it’s a white picket fence to line with hollyhocks or an old iron bed frame covered with vining morning glories. 

Maintaining a Cottage Garden

While they tend to give the impression of having sprung up naturally, cottage gardens can take quite a bit of maintenance. 

Watering

How often you need to water will depend on various factors, including the varieties you’ve chosen, your location, and the weather each year. While some flowers are more drought-resistant than others, like echinacea, most flowers will produce more blooms when they receive adequate water. 

If you want a low-maintenance garden, it may be worth investing in drip irrigation, soaker hoses, or a sprinkler that you can set to a timer.

Deadheading

Many flowers will have longer bloom periods if you consistently deadhead them. This means that you remove spent flowers. Some varieties that do well with this include zinnias, hollyhocks, sweet peas, petunias, cosmos, delphiniums, and bee balm.

Keep Plantings in Check

You may notice that many cottage gardens include flowers like rudbeckia that tend to naturalize and spread on their own. To prevent these from pushing out other less vigorous varieties, you may need to weed them out of areas you don’t want them to spread. You can also share clumps with others or move them to new places in your garden. 

Dividing Perennials

Some perennials like phlox, heuchera (coral bells), and chives perform best with periodic dividing. You’ll want to divide them every couple of years to keep them looking fresh and thriving. Thankfully, this is another great opportunity to expand your garden or share with friends. 

Cottage gardens are a fantastic choice for creating a garden that represents your uniques style and grows with you. Use these tips as a starting point as you grow your own.

Saving the Past for the Future