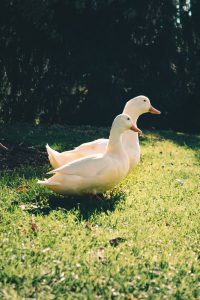
14 Varieties to Help Kids Fall in Love with Growing Food

In today’s modern, busy life getting kids in touch with the natural world can be tough. Finding time to get outside with family and grow something can be incredibly helpful for children. It helps them connect with nature, learn about where their food comes from (no it doesn’t just appear in the store), and develop healthy eating habits. Even with the best-laid plans gardening with kids may not be the happy idyllic family moment we picture in our minds. Gardening really is hard work! One way to help kids get excited about gardening is to grow fun and exciting varieties.

Green Pod Red Seed Asparagus (Yardlong) Bean

Kid’s will marvel at these enormous beans the first time you add them to your garden. They’re also a super reliable, trouble-free variety and if properly trellised their towering vines can make excellent tunnels or forts for kid’s to play in.

Chioggia (Dolce Di Chioggia) Beets

Slicing one of these beets reveals a gorgeous bullseye pattern. Beets are also a great choice for kids because their sweet, mild flavor makes them easy to slip into other food like berry smoothies or even chocolate cake!

Purple Dragon Carrots

Carrots seem to have become typical little kid food and these purple carrots pulled fresh from the garden are sure to impress more than their whittled down grocery store counterparts.

Strawberry (Two Inch Strawberry) Popcorn

This variety is absolutely adorable and makes an amazingly easy to store snack for winter. Being able to pull out a jar of red popcorn to pop together on a winter afternoon provides double the fun!

White Wonder Cucumber

These little slicing cucumbers are a wonderful size for children to pick and eat. They have great flavor and are very productive.

Rainbow (Five Color Silverbeet) Swiss Chard

These rainbow greens might help make leafy vegetables more appetizing for your kids. They also have larger seeds than many greens making them easier for small children to plant.

Cossack Pineapple Ground Cherry

These tasty little fruits have a flavor reminiscent of pineapple. Small and easy for children to pick on their own, they’re sure to be a star in your garden. Just don’t expect too many of them to actually make it into the house!

Green Arrow Dwarf Shelling (English) Pea

Peas are nice big seeds for little hands to plant. They also have sweet little flowers and vines. They’re fairly easy for small children to pick and shelling them together can be a great family activity.

Connecticut Field Pumpkin

What child wouldn’t want to grow their own jack-o-lantern? Unlike store-bought Halloween pumpkins you’ll know exactly what these were grown with so you can eat them too!

Amy’s Apricot Mix Cherry Tomato

Cherry tomatoes are super easy for kids to go into the garden and pick for themselves. This variety tends to vary a lot so you’ll probably end up with a mix of colors and shapes which can make them even more fun for kids. Other great cherry tomato choices include Matt’s wild cherry tomato (red) or lollipop tomatoes (yellow).

Amish Moon and Stars Watermelon

If you have the space for a watermelon patch, moon and stars watermelons are stunning. They generally have one or two larger yellow spots (moons) and tons of smaller yellow spots (stars) on their dark green rinds. They make a super fun space themed snack for any kid.

If you don’t have space or long growing season for Amish moon and stars you might consider a patch of sugar baby watermelons. They’re a delicious, easy to grow, space saving variety.

Johnny-Jump-ups

These tiny flowers are super easy to grow and edible. Munching on a few flowers may help kids feel at home in the garden.

Nasturtiums 

One of my favorite flowers, nasturtiums are so whimsical they have earned their place in fairytale lands like Tolkien’s Middle Earth. They’re vining nature, cute orange flowers and lily pad-like leaves help make the garden a magical place. They’re also entirely edible, perfect for young children who like to try everything.

Mammoth Sunflowers

With 9ft stalks and 11in heads, these mega sunflowers will impress kids and adults alike. Just make sure the kids keep the shell spitting contests outside!

For more tips on getting your children gardening, check out Get Your Kids Involved in the Garden!

Pin it for later.

“Spotting On” or “Pricking Out”: How to Pot Up Tiny Seedlings to Save Time & Money

“Spotting On” or “Pricking Out” refers to separating and potting up tiny just-emerged seedlings. You can use this technique to germinate a lot of seed in a small container. That’s useful when you have older seed or home-saved seed that you’re not sure will germinate well. You’ll be able to maximize space in your best seed-germinating set-ups (like heat mats or germination tanks). Transplanting tiny seedlings also saves the heartache of thinning.

1. Handle tiny plants by the roots or leaves. The stems are irreplaceable and easily crushed, killing the plants. Roots and leaves can easily re-grow!

2. Spot on when the plants are still tiny, as soon as the cotyledons (seedling leaves) have spread out and turned green, or before. You will probably find the plants are at a mix of stages — there may be some seeds just below the surface that are just barely sprouted. These can be potted up as well!

3. Carefully remove small sections of plants and gently tease apart the roots. I like to use the tip of a hori-hori to dislodge the plants.

4. Have the new pots or flats ready to go, with the potting soil appropriately moist. Once you start separating seedlings, the roots can quickly dry out, so plan to move any plants that will be exposed.

5. Push aside the soil with a popsicle stick or similar tool to make a hole. Holding the plants by a leaf, place in the hole. Try to keep the root pointing downwards.

6. Press down on the soil around the base of the plant to ensure good soil contact (this prevents drying). Gently water straightaway. If transplanting into a flat, you should water the whole flat again when it’s full.

Ta-da! You can save dozens or hundreds of plants by using this method rather than traditional thinning! Give your extra seedlings to friends, donate them to community gardens, or dig yourself extra garden space and plan to preserve the bounty of your garden!

The Power of Fermented Foods: Making Sauerkraut

You may have heard  people talk about how good yogurt is for you because it contains probiotics. However there’s actually a variety of foods that are naturally fermented and contain these helpful organisms. When made at home, products like kimchi, certain pickles, kombucha, and even natural sodas are all chock full of probiotics. One of the easiest foods to ferment yourself is Sauerkraut.

Benefits of Sauerkraut

  • It’s great for gut health.
    The probiotics in sauerkraut helps keep your digestive system healthy.
  • Kraut is highly nutritious.
    The fermentation process makes the vitamins and minerals in cabbage more accessible to your body.
  • It’s good for your immune system.
    Many studies show having a healthy digestive system is important to having a healthy immune system.
  • It’s a  great way to preserve and use extra cabbage.
    It can last for months in the fridge or cold storage.
  • It may help improve your mood.
    Some recent studies have led scientists to believe that there’s a connection between gut flora and a person’s mood. Eating fermented foods like sauerkraut may help you feel better physically and emotionally.
  • It’s simple to make.
    Sauerkraut requires just 3 basic ingredients and there’s no fancy equipment needed!

Want to make your sauerkraut? Here’s what you’ll need to get started:

  • Cabbage
  • Kosher, pickling, or sea salt (non-iodized)
  • Knife and cutting board
  • Mixing bowl
  • Clean jar or jars with lids

To begin rinse your cabbage and then set a few nice, whole cabbage leaves to the side (you’ll need one per jar). Then finely slice your cabbage. If you’re doing a lot of kraut you may want to use a mandolin vegetable slicer however I usually just use a knife.

If you were to read more on the most popular recipes on the internet, you’d know that a lot of recipes call for a specific amount of cabbage but you can use as much as you’d like to make and adjust your salt to the amount of cabbage you’re using. You should use approximately 1 1/2 tsp of salt for every quart of kraut you’re making.

Once you’ve sliced your cabbage, place it in a mixing bowl. Slowly add the salt while squishing the salt and cabbage together with your hands. The cabbage will begin to look slippery and shiny. Eventually there should be a good bit of juice (called brine) in the bowl. You should be able to see it run out of a handful of cabbage when you squeeze it. If you taste your cabbage, it should be pretty salty but not disgustingly so.

Then you can pack your cabbage into a clean jar. Start with a spoonful or handful at a time carefully packing each one into the jar to avoid any air pockets. You can use a clean spoon, your hand, a tamper, or a pestle. Leave at least an  1 1/2 inches of head space in your jar.

Use the cabbage leaf you set aside at the begin to cover the top of your kraut. You want all of your cabbage to be fully submerged. You can way your kraut down with a sterilized stone like I did for these pickles or if you have enough room you can use a little dish of water. You can also use a ziplock bag of water or a crock weight if you have one.

Place your jar or jars of kraut out of direct sunlight but somewhere you will remember to keep an eye on them. You kraut will need to ferment between 4-14 days. It will ferment faster in warmer temperatures. You should open your jar at least once per day to let out any gases that have built up. You don’t want your jar to explode. You may also need to pack the cabbage down if you notice any above the brine or any air pockets. If you notice a film on top of the brine you can just scrape it off. It won’t hurt you.

You’ll know your kraut is finished when it is more yellow than green and translucent. It’s flavor will get more intense the longer it ferments so how long you leave it is up to you. Once it’s finished you can store it in the fridge or a cool root cellar to stop fermentation.

Pin it for later.

Saving the Past for the Future