Tag Archives: harvest

Harvesting and Curing Potatoes

If you grew up with a family garden, you might remember the joy of gathering up potatoes, like finding buried treasure right in the backyard. Even if you didn’t grow up with a garden, you’ll quickly see the joy in a potato harvest. There’s something magical about hoping for a good harvest and unearthing piles of tasty potatoes. However, it’s not as simple as just digging. There are a few key steps to take when harvesting and preparing your potatoes for storage.

Harvest Your Potatoes When the Plants Die

Harvest your potatoes after the plants turn yellow and brown and die back. This ensures that your potatoes are as large and mature as possible. It also improves their storage ability. The plants dying indicates to the potatoes that the growing season is over. 

Potatoes can tolerate a light frost, but it’s generally best to harvest them before your first hard frost is expected.

Don’t Leave Your Potatoes in the Sun

Leaving potatoes in the sun will cause them to turn green. Green potatoes taste bitter, and if you eat enough, it can cause upset stomach, vomiting, and diarrhea. If you have a potato with a green spot, you can trim it off, but if the whole potato is green, compost it.

Harvest Potatoes Carefully

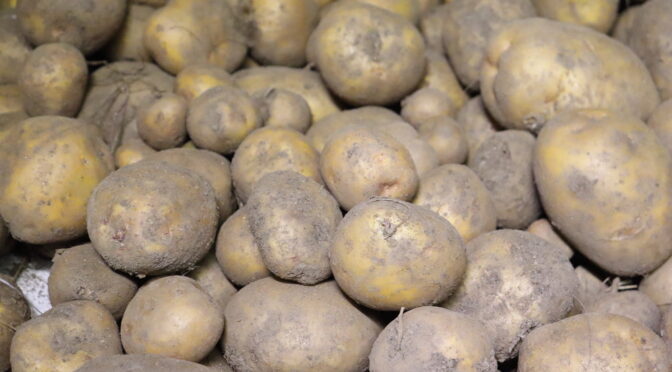
Usually, it’s easiest to lift potatoes from the ground with a garden fork. However, you must do your best to avoid damaging your potatoes. Any potatoes with cuts, insect damage, or bruises should be separated and used immediately or composted if necessary. 

Cure Your Potatoes

Potatoes can’t go straight into storage after harvest. You must cure your potatoes. Curing thickens the potatoes’ skins, allows minor cuts to heal, and slows their respiration (a process where they convert sugar and starches to carbon dioxide and water). 

In an ideal situation, it’s best to cure potatoes at 45 to 60 degrees Fahrenheit and high relative humidity (85 to 95 percent) for two weeks. However, most of us don’t have giant walk-ins or places we can control the temperature and humidity like that. Instead, spread your potatoes out somewhere in your home that’s cool, dark, and relatively moist. A basement, mudroom, outbuilding, or spare bedroom may work. 

Lay your potatoes out in a single layer with space around them. You don’t want them touching each other or piled up; plenty of airflow around them is critical. Leave them to cure for two weeks.

Sort Your Potatoes Again

Go through your potatoes once more before storage. Remove any that have shriveled or those with damage or bruising. One rotten potato can spoil your others in storage!

Store Your Potatoes

Potatoes store best in spaces that are cool, moist, and dark. In a perfect situation, we recommend storing them in a spot that stays between 40 to 45 degrees Fahrenheit with a relative humidity of 90 percent. However, we can’t all create perfect conditions, but you may have a space that would work well. A cool garage, basement, or second refrigerator can work as potato storage. Don’t store them anywhere that they could freeze.

If you keep your potatoes somewhere above 45 degrees Fahrenheit, they will probably start to sprout in just 2 to 3 months. If you store them in a space with temperatures below 40 degrees Fahrenheit, they may develop a sugary flavor. Placing them back at room temperature for a few days before use should correct this and make them starchy again.


Potatoes are an excellent staple crop for the home gardener. For relatively little effort, they can provide nourishing meals well into the winter months, but good harvesting, curing, and storage practices are essential! Follow these steps when harvesting your potatoes this fall.

Harvesting & Curing Winter Squash & Pumpkins

How do you tell they’re ripe?

If you’ve never done it before determining if winter squash is ripe can be a bit more difficult than picking tomatoes or green beans. It’s also very important that it is ripe if you want it to store well through the winter.

The biggest indicator that winter squash and pumpkins are ready to be harvested is their stems. The stems should be hard and dry. Often you can tell that the plant is beginning to die. The fruits should also be their mature color and sound hollow when patted with an open hand.

Harvest

When they’re ready it’s time to harvest! Simply cut the fruit from the plant, leaving about 1 inch of stem with a knife or garden shears. Lightly wipe off large clumps of dirt with your hand.

Never carry your squash or pumpkin by their stem as breaking them off often drastically reduces their storage ability. Also try to avoid handling them roughly to reduce bruising and nicks.

If a hard frost is imminent you should go ahead and harvest any squash left on the vine even if it’s not perfectly ready. Hard frosts can damage squash and make them rot. Just keep in mind that squash harvested early may not keep quite as long so it should be used first. Leaving a longer stem can help them finish maturing properly.

Curing

Before you can store your winter squash it needs to be cured for about 7-10 days depending upon the variety. The best way to cure squash is to lay it out on a dry surface with enough space for air to move around it. Every day or so your squash should be moved or turned over to a new position.

A picnic table in your yard will work if the weather’s still warm enough, a pallet in your hoop house, your kitchen table, or even sunny windowsill.

The curing process allows the skin to toughen up so that your squash will be ready for storage.

Storage

Winter squash is one of the lovely foods that takes little effort to store at home. Ideally you should find a dry place to store your squash where the temperature stays between 50°F and 68°F degrees.

You might find a place in a spare bedroom, office, under a bed, or in a coat closet. You should store your squash in a single layer and not touching. That way if one begins to rot it won’t effect the others.

While your squash is in storage you should be careful to check it at least once a week for soft spots or mold. Use any squash that are starting to go bad immediately.

How to Harvest Garlic Scapes

garlic scapes

Do you harvest garlic scapes while they’re still straight or after they’ve curled?

Garlic scapes harvested young are still tender enough to eat raw (although too pungent for some palates!) They can be cooked in stir-fries, pickled, or made into pesto. Harvested a little older, you may need to break off the woody bases, similar to asparagus, and just use the tender tops.

Scapes are the leafless flower stalks of hardneck garlic varieties. Harvesting scapes encourages the plants to put more energy into bulbs, increasing yields and improving quality. It’s usually done a few weeks or up to 2 months before the bulbs are ready for harvest. While scapes may be harvested by snapping or twisting them off at the base, many gardeners prefer to use pruning shears or clippers. A warm, dry afternoon is recommended for harvesting scapes, as this promotes fast healing.

While some folks advise to harvest when the scapes have curled once, others recommend harvesting while they’re still straight. The truth may be that tenderness varies by variety — some varieties stay tender after curling, while other varieties are best harvested earlier.

garlic scapes freshly harvested

We’d love to hear from you! Have you found variation by variety? Do you always harvest at the same stage?

Remember, we take pre-orders all year for our fall-shipped heirloom Garlic cloves for planting!

These links offer advice for growing your own garlic:

Garlic and Perennial Onion Growing Guide

Garlic and Perennial (Multiplier) Onions: Harvest and Curing