Tag Archives: soil health

Soil Texture: The Jar Test

It’s easy to see that great gardens come from healthy soil. However, it’s less easy to understand how to build healthy soil. There are micro and macronutrients to consider, acidity, cover cropping, the soil food web, and so much more. One way we can examine our soil and easily make adjustments is by understanding its texture. Soil texture determines how it “acts,” like when you’re trying to dig a new bed or get heavy rain. 

One of the easiest ways to examine your soil texture is to do the jar test or the mason jar test. 

The Jar Test

To complete this test, you’ll need some basic supplies; a ruler, permanent marker, water, soil samples from the root zones of your plants, and a clear jar for each sample. You don’t need to go crazy with samples, but it’s worth doing a couple, especially if you have a large garden or multiple. 

  1. Place your soil sample in the jar. It should be about 1/3 of the way full. 
  2. Fill the jar almost to the top with water.
  3. Shake thoroughly for a couple of minutes. 
  4. Place the jar aside until everything settles. This may take several hours.

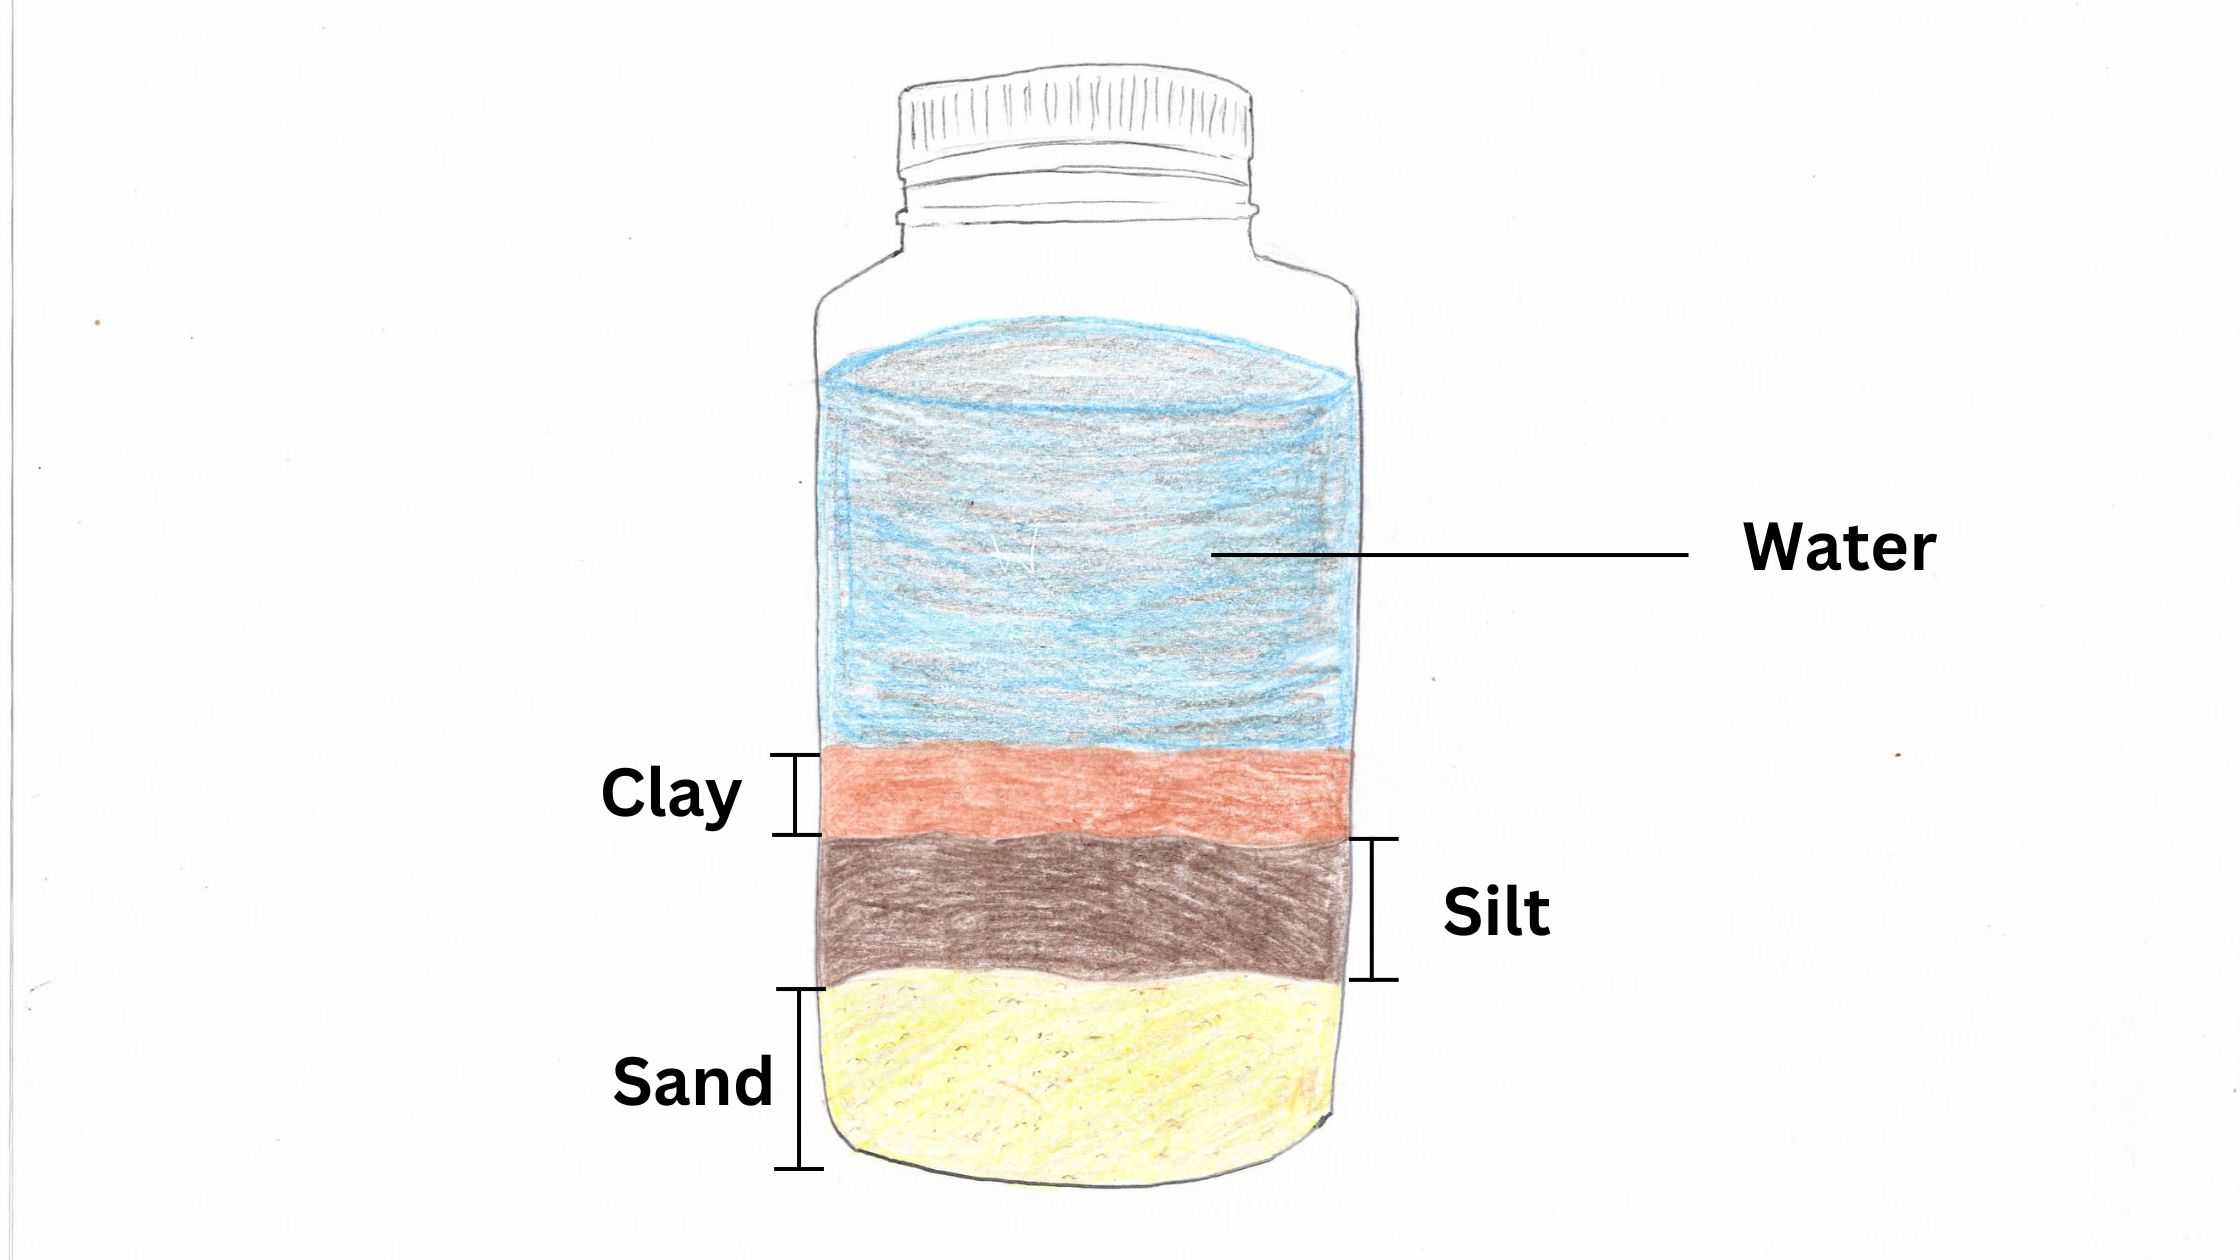
When you return to your jar, you’ll immediately notice that it has separated into layers. The bottom layer will be sand. Sand particles are larger and heavier, so they settle out first. The layer above the sand will be silt with slightly larger particles, and the top layer will be clay with very fine particles. You may also see some organic matter floating at the top.

Jar Test for Soil Texture DiagramNow you can begin measuring. If it’s helpful, mark the edges of the layers with your marker. Then measure the total height (not including water) and the height of each layer. Once you’ve got these measurements, you can calculate the percentage of each.
% Sand = (height of sand / total height) x 100

% Silt= (height of silt / total height) x 100

% Clay = (height of clay / total height) x 100

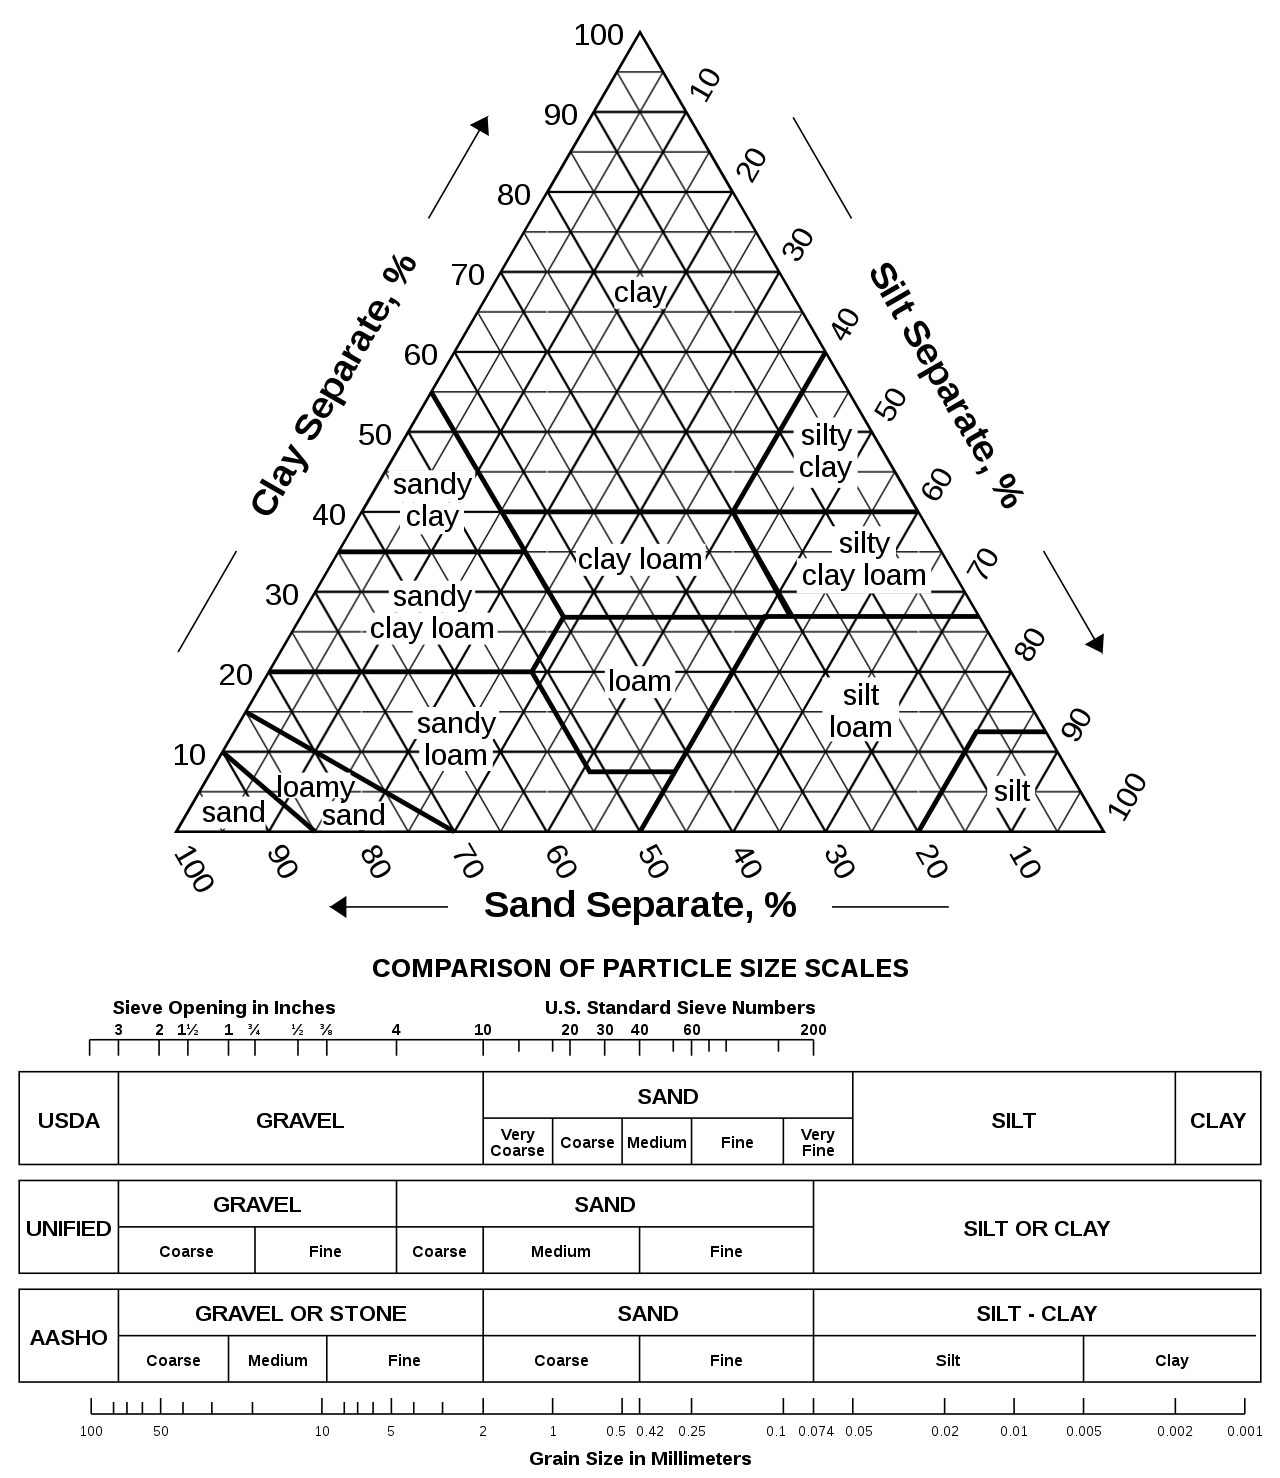
Now you can use this handy chart from the USDA to find your soil type based on the percentages. 

Soil Texture Chart from USDAFor example, if you got 60% clay, 20% silt, and 20% sand; you have clay soils.

Let’s say you got 15% clay, 15% silt, and 70% sand; you have sandy loam soils.

You can also use the NRCS Soil Texture Calculator.

What Does My Soil Texture Mean?

Different soil types behave differently.

Clay Soils

Soils higher in clay tend to be high in nutrients and hold water well. Unfortunately, they can also be hard to dig in, too dense for large roots to grow, and tend to become waterlogged.

Sandy Soils

Sandy soils are very easy to dig in and allow for easy growth of large roots (think big carrots). They also drain well and warm up quickly in the spring. Unfortunately, sandy soil doesn’t hold nutrients or water well, meaning plants grown in them may suffer from nutrient deficiencies and drought.

Silty Soils

Silty soils are in between sand and clay. They tend to have more nutrients than sandy soils and hold water better but are still easier to cultivate and dig than clay soil. Unfortunately, silty soils compact easily and tend to form a crust. They also have poor water filtration. 

How Do I Change My Soil Texture?

Most of us would love it if we got ‘loam’ as a result, but it’s unlikely we will. Our region and the land’s history will largely determine the soil we get to begin working with. 

The best amendment for any soil type is organic matter. You can add organic matter to your soil through composting, cover cropping, mulching, and manures. 

Be careful if you decide to add other amendments like sand or gypsum. These can make soil problems worse when added incorrectly. 

There’s a lot to learn about soil, but understanding soil texture is an excellent start to improving your garden. Use the jar test to learn about your soil texture today!

Fall Tasks: Mitigate Plant Diseases

Just like humans, plants are susceptible to a number of diseases. It’s an unfortunate part of gardening. Your cucumbers may suffer from Downey mildew, your tomatoes may get verticillium wilt, your potatoes may suffer from late blight, or your corn may get leaf rust. Thankfully, there are ways to strive for healthier plants. Here are some steps you can take this fall to help mitigate plant diseases. 

Study Plant Diseases

Try to identify the specific plant disease infecting your plants. Once you’ve identified a particular disease, you can find information about the transmission (how it infects your plants), different host plants, and what type of environment it requires to thrive. This information will help you control it. 

For example, you may have had a few tomatoes infected with Fusarium Wilt this year. Fusarium Wilt typically enters the plant through the roots, often in areas damaged by nematodes. Unlike many fungal diseases, it doesn’t spread by the wind. It’s typically brought in on infected soil or equipment. It thrives in acidic soil and will infect tomatoes, eggplants, peppers, pigweed, mallow, and crabgrass. Knowing this, you can take steps to mitigate the issue. Keep that bed free of these plants for a couple of years, amend your soil with lime, and sanitize all equipment. 

Clear Away Diseased Plant Material

Many of us strive to have natural systems in our gardens, and what seems more natural than just letting plant material decompose right in the bed? While this is sometimes fine, if the material is diseased or your garden is prone to diseases of that crop, you should remove the plants. 

Diseased plant material can be burned, buried away from the garden, or composted in a well-managed compost pile. Compost piles must reach a temperature of at least 140 degrees F to kill fungal diseases!

Sow Cover Crops

Tillage radishes are an excellent choice for fall and winter kill in areas where temperatures reach below 20°F. They also have biofumigant properties, ideal for suppressing diseases and pests. They also improve soil structure, creating spaces that allow air and water to enter and a great for breaking up hard pans.  

Other fall cover crops like Austrian winter peas and winter rye are also great for building healthy soil by adding nitrogen, nutrients, and organic matter. 

Write Down Where You Planted Crops

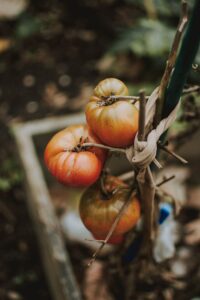
Fall tomatoes (mitigate plant diseases)Crop rotation is key to disease prevention in every garden. No matter what size your garden is, come next spring, it can be tough to remember exactly where you planted what the previous season. While many don’t have the time or desire to create a comprehensive garden journal, you should at least sketch out your 2022 crop layout before you forget it this fall. That way, there’ll be no doubt in your mind next spring that you’re planting your tomatoes in a bed that didn’t previously have nightshades. 

Alternatively, there are many gardening planners and apps available. Check out the Southern Exposure Garden Planner to quickly create layouts for your records and plan for next season. 

Start Building Healthy Soil

It’s a good idea to have your soil tested in the fall and work to improve it over the fall and winter. Begin a compost pile and add compost to your garden. Compost adds nutrients and helps improve the soil structure leading to healthy root systems. Plants are far less susceptible to disease when grown in healthy, well-balanced soil. 

Research Disease Resistant Varieties

Even among open-pollinated varieties, there are many disease-resistant cultivars available. They’re worth looking into if you struggle with a specific disease each year. 

On the Southern Exposure website and catalogs, you’ll find some crops like tomatoes and cucumbers are marked with acronyms in brackets after their name. These acronyms stand for known disease or pest tolerance and are listed in our keys to disease and pest tolerance. For example, a variety marked with “an” has resistance to Anthracnose.  

Many other seed companies use the same system, though the acronyms may vary slightly. You can also find lists of disease-resistant varieties through your local extension agency or a quick internet search.

Sanitize Your Equipment

Especially when dealing with a highly infectious disease or pruning and handling diseased plants, be sure to sanitize equipment. Sanitize small tools like pruning shears, garden knives, and trowels with alcohol. You can also use a bleach solution to wash larger tools and work surfaces. 

While having a perfect garden is impossible, we can strive to minimize and even mitigate plant diseases. Taking these steps this fall will help you create a healthy garden and have a more productive 2023!

Cover Crops for Beginners

We’ve mentioned cover crops in many articles on the blog before. These humble plants are an integral part of organic farming with many benefits for gardens, big and small. Today, we’ll take a deeper look into cover crops and how to use them for beginners.

Why Should I Grow Cover Crops?

There are many different types of cover crops which are all grown for specific reasons. Cover crops prevent erosion, decrease weed pressure, add organic matter to the soil, add nitrogen, and retain soil moisture. They also help provide food and habitat for beneficial insects and microorganisms. 

Choosing Cover Crops

As I mentioned above, there are many different cover crops. Generally, we can divide them into a few different categories by the primary purpose they serve in your crop planning.

Nitrogen Fixers

Nitrogen fixers are plants with a symbiotic relationship with bacteria known as Rhizobium. These bacteria colonize the nodules on the plants’ roots and allow the plant to take nitrogen from the air and use it. When these plants die or are cut back and added to the soil, they add nitrogen. Some nitrogen fixers include:

  • Red Clover
  • Crimson Clover
  • White Dutch Clover
  • Sunn Hemp
  • Hairy Vetch
  • Austrian Winter Peas
  • Iron and Clay Southern Peas
  • Alfalfa

All of the clovers are excellent for attracting bees to your garden. Perennial white dutch clover is a great choice for permanent garden pathways and can be mowed and used as mulch around plants. 

Austrian winter peas are a great winter option in zone 6 and up. Their shoots are edible and make excellent additions to winter salads. On the other hand, massive sunn hemp plants are day-length sensitive and do best as a summer cover crop. It thrives even during drought and is excellent for suppressing nematodes. 

Deep Rooted Cover Crops

Cover crops with large or deep roots are essential in areas with heavy clay or compacted soils. These large rooted crops help break up hard pans, add pockets for air and water, and add organic matter. A couple of our favorites are:

  • Deep-Till Radishes
  • Alfalfa

Deep-Till radishes produce large, fast-growing roots for aeration and breaking up compacted soils. They also have biofumigant properties, which are excellent for suppressing diseases and pests. They winter-kill in areas where temperatures reach below 20°F. 

Alfalfa is a nitrogen fixer with deep roots and is good at gathering water and nutrients from deep in the soil. It will add nitrogen and organic matter to the soil. Plus, it’s very cold-hardy, making it perfect for early spring or late fall plantings. 

Buckwheat (cover crops)Grasses & Mulchers

The main job of these cover crops is to produce a lot of organic matter. They form a ground cover that helps prevent soil erosion and gathers nutrients from the soil. They make excellent mulch in no-till systems and add nutrients and organic matter to the soil as they decompose. Some great options include:

  • Hulless Oats
  • Winter Rye
  • Wheat
  • Buckwheat

Rye is a good choice if you’re looking for a winter cover crop. It has an extensive root system for improving soil structure, suppressing weeds, and enhancing soil life. It’s also able to stabilize excess nitrogen from heavy manure applications. A combination of rye and vetch is a favored cover crop for no-till tomato planting. 

Buckwheat is the best choice when you want something fast, producing a green manure crop in 30 to 45 days! It’s great for out-competing weeds and providing mulch for fall crops when planted in midsummer. The little white flowers attract beneficial insects, including parasitic wasps. 

Growing Cover Crops

Cover crops can be grown year-round. It’s a good idea to plan to leave your soil bare as little as possible. Sow cover crops in beds as soon as others are finished, whether that’s the middle of summer or fall. You can also use cover crops to provide sections of your garden with a needed boost of nutrients or organic matter or to suppress pests and diseases.

Knowing when you want to plant will help you determine which cover crop is appropriate for your situation. Some cover crops like winter rye, hairy vetch, and Austrian winter peas make excellent winter cover crops when planted in the fall. Other crops like buckwheat or sunn hemp will perform much better for summer crops. 

Once you’ve decided on a variety, you should follow the seeding instructions. It’s essential to follow the recommended seeding rates. Seeding your crops too thinly won’t achieve the desired benefits. 

Terminating Cover Crops

This step may sound scary, but it just means you’re ending the cover crop’s cycle so that you can plant something else. This process is typically done by mowing, weed whacking, scything, or tilling. In a no-till system, you can often use the material as a mulch and transplant it right into it or rake some back for direct seeding.

Typically, you should terminate cover crops before they go to seed. However, sometimes you may decide to let a quick-growing crop like buckwheat go to seed and grow again. Remember that you may have to continue to weed it out for a while after this; cover crops are good at suppressing weeds because they’re a bit weedy in nature themselves!

Winter Kill 

Nature also lends a helping hand for certain fall-planted cover crops. Those crops that are sensitive to frost or cold temperatures will winter kill and begin decomposing into the soil on their own. Some no-till farmers will plant directly into this crop residue in the spring.

Growing cover crops is quite simple and has many benefits. This fall, try growing cover crops in your garden to add nutrients and organic matter, reduce erosion, and encourage beneficial insects and soil organisms.